![]()
|
|
![]()
|
|
By following this tutorial, you will use the wizards and server behaviors from MX User Login to create a secured area for a job site. The tutorial can also be used for any other similar application that has restricted access areas.
The job site has two secured areas: one for job applicants and the other for companies seeking a candidate.
Companies can register to the web site.
After registration, they can immediately login to the secured area, using a login form.
Users can also register to the web site, but they need to activate their account via e-mail, before they can login.
Companies and users will keep their passwords encrypted in the database . If they forget the password, they can have a new one generated and sent by e-mail.
Users can also retrieve forgotten passwords by using a special form.
Users cannot access the companies area and vice-versa. Two access levels will be defined to differentiate between the two.
Both users and companies can safely log out from the secured areas.
Before starting this tutorial, please configure the Login Settings of your site from the InterAKT Control Panel, accessible from the Insert bar -> MX Kollection tab.
First, configure the Options tab as shown
below:

Second, configure the Database tab:
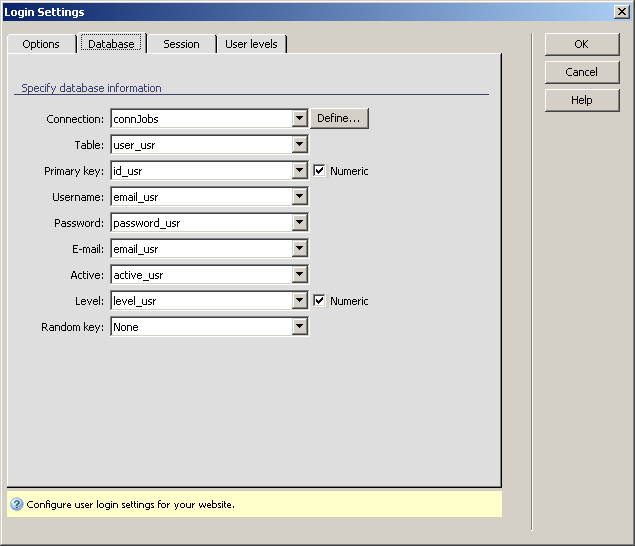
Note: If you do not select a table field to store the active status in the Active drop-down menu, the Use activation checkbox that determines the use of activation will not be available, and you will not be able to use this feature.
As you can see, we set the User name to be the email_usr in order to show that the e-mail address should be unique (you cannot have two users with the same e-mail address).
Note: The user name table column must be configured as an unique key . Otherwise, the login will not work, an error message stating that more than one user was found being displayed.
Leave the Session tab settings as they
are and then configure the User Levels tab:

We decided to use user levels so first configure the User level information:
In order to be able to follow the User Authentication section of this tutorial, please create the following structure:
If you have the MX Kollection 3 bundle installed, then you have all the needed tools. Otherwise, the following separate products should be installed on your computer in order to complete this tutorial section:
MX User Login
MX Send E-mail
The estimated completion time for this section is about 25 - 40 minutes. It depends on your authoring knowledge with Macromedia Dreamweaver (MX or MX 2004) and MX Kollection 3.
This section contains the following topics: