![]()
|
|
![]()
|
|
In order to allow registered users (regardless of their access level) change account information (e.g. the e-mail address and the password), a page containing an update transaction must be built. For this tutorial, there are two of these pages, one in the company folder, and one in the user folder. The creation method is the same for both, with only minor differences, that will be highlighted.
To build the account update page, follow the next steps:
Open the company/update_account page in Dreamweaver.
Apply the Update Record Form Wizard from the MX Kollection tab of the Insert panel.
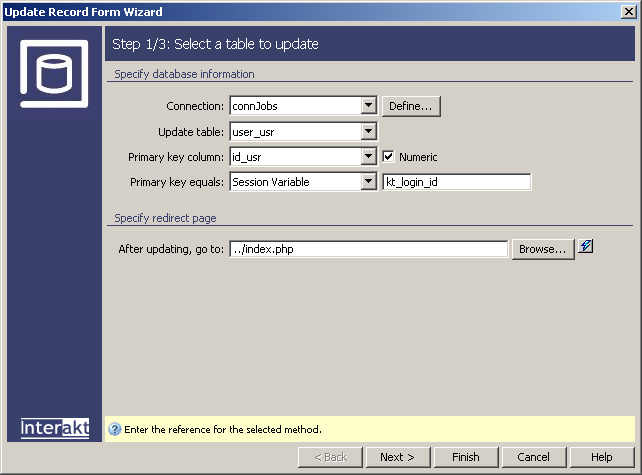
Configure the dialog box as follows:
In the first step, the connection and the user_usr table are already selected, due to the UI persistence.
Set the Primary key equals condition to match the kt_login_id session variable. This stores the currently logged in user ID.
In the After
updating, go to field use the Browse
button to select the index file in the site
root.
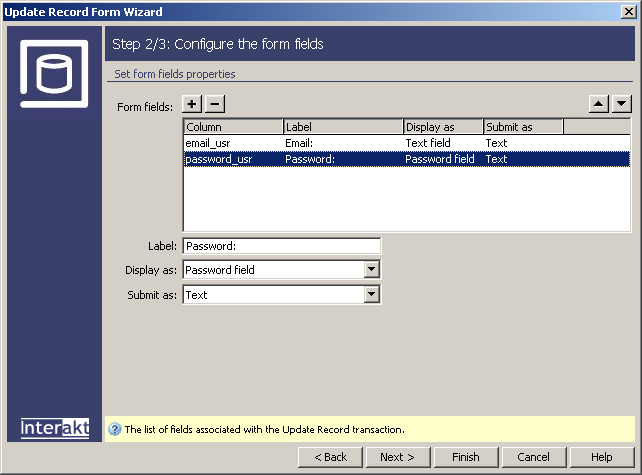
In the second step
of the wizard, you must select the form fields to display on page. The
email_usr and password_usr
table columns are already selected. Set the Display
as property for the password_usr column
to Password field. The wizard will see that
the table used for update is the same specified in the Login Settings
section of the Control Panel, and that the password_usr
column stores the passwords. Therefore, it will generate two more fields
concerning the password: Old Password and
Re-type Password
The third step of the wizard is available only if you have MX Form Validation installed, and allows you to define validation rules for each form field. If available, set the Validation format for the e-mail field to E-mail.
Click the Finish button to close the wizard and add all elements into the page.
Save the page and preview
it in the browser.
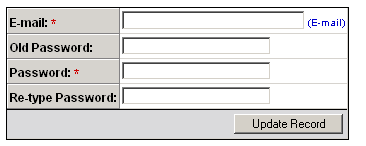
As you can see, all required password fields are displayed in order to ensure a correct update.
Aside the generation of new password fields, the update wizard added several server behaviors: The Check Old Password Trigger and the Throw Error trigger. The first checks if the entered old password is correct, while the second verifies if the two new passwords match.
The same steps must be followed for the user/update_account page. There is no difference in the page construction, but only in the restrict access to page code added through the Restrict Access To Folder command. This is necessary, as the update transaction uses the user ID stored in a session variable.