![]()
|
|
![]()
|
|
Open the register_company page and start the
User Registration Wizard to generate a company
registration form (Insert bar -> MX Kollection).

Then follow the next steps:
First, you get informed about your current database
settings.
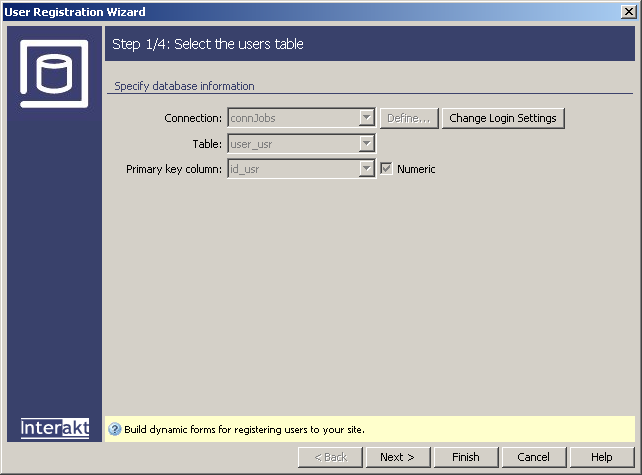
Click on the Next >
button to move on to the wizard's second step. Here you should configure
the fields that will be displayed in the registration form:
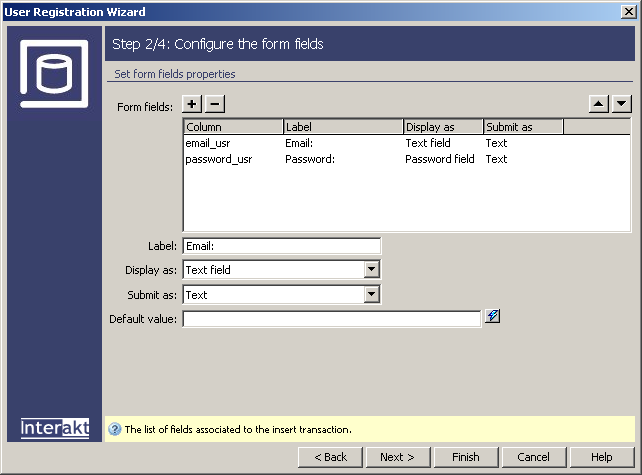
· Leave the
setting for the email_usr field at their
default value, to be displayed as a text field.
· Select
password_usr and choose the Password
field in the Display as drop-down menu, if not already set. This
is a must, as it will automatically generate the confirm password field
as well.
· Delete
the rest of the fields from the grid.
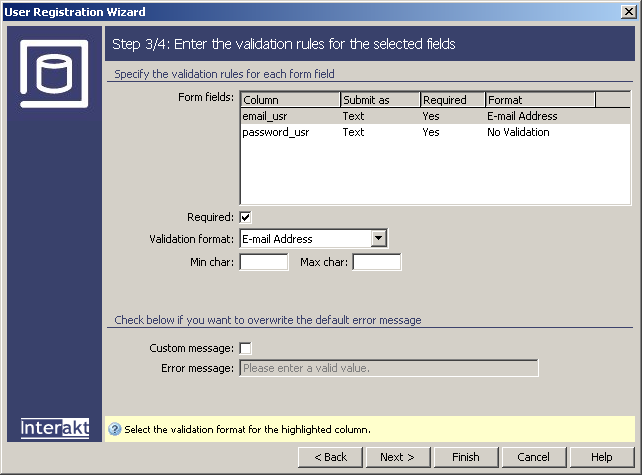
The third step of the wizard
is available only if you have MX Form Validation
installed, and it provides a quick and efficient way of defining validation
rules for the fields involved in the registration operation. Apply the
E-mail format on the email_usr field, and
no validation in particular for the password_usr field. All fields are
required to be filled in however.
Click Next >
to configure the last step of the registration process. Companies will
receive an welcome e-mail, but they will not be required to activate their
account. You will use account activation
only for registering users,
in order to prevent fake accounts. Check the corresponding settings, as
seen in the image below:
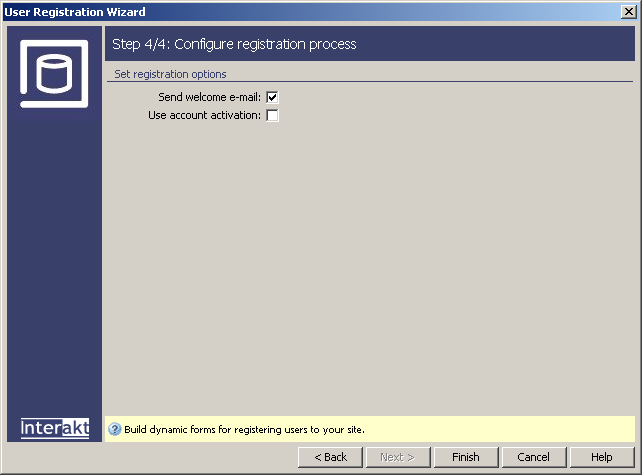
Note: if you did not select a table field to store the active status in the Control Panel's Login settings area, the Use activation checkbox is disabled.
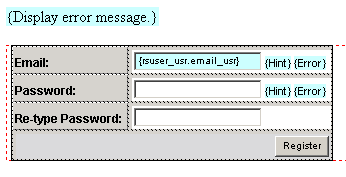
Now the wizard's all done and completely configured, so you can go ahead,
click on the Finish button and check the
results in Dreamweaver:
Note: If you use this server behavior on the ColdFusion server model, a file named Application.cfm will be automatically generated in the site root folder. Do not delete this file, as it contains settings related to session variables used by the server behavior and the current application. If you remove this file or modify it, application pages that use sessions will not function properly.
As you can see, because you configured password_usr to Password field, this field has been duplicated in the form. The newly generated field's label is Re-type password. The Throw Error trigger generated by the User Registration Wizard will check if the values entered in the two password fields match. Else, the trigger throws an error message. You can edit this message by double-clicking on Throw Error trigger in the Server Behaviors list.
This wizard also applies a Send E-mail trigger. It will send a welcome e-mail message to the newly registered company. Edit the Send E-mail server behavior and configure the From field.

If you already configured the E-mail settings from the InterAKT Control Panel, you don't have to configure the From field. {KT_defaultSender} is the value you entered in the Default Sender field (E-mail settings).
As you can see, the mail body will be retrieved from the includes/mailtemplates/welcome.html file distributed with the extension.
You might have noticed that two rather important fields have been left out: active_usr, and level_usr. The active field is set to use the default value of inactive, and the level must be set accordingly for the company. To prevent possible meddling from a benevolent user, you should not use hidden fields to pass these parameters. For a solution, see the Secure registration section of the tutorial, showing you how to use the Add transaction fields server behavior to pass additional fields to the insert transaction.
When you're done setting up all fields, save the page and test it in the browser. Register with a company account, and then check the database. You will see that a new company has been added in the user_usr table having the password encrypted.
The newly inserted company will receive an e-mail similar to the following:

Go to the next topic and secure the registration.