![]()
|
|
![]()
|
|
In this topic you will use features available only in MX Kollection 3 Professional to enhance the user section of the job site. You will add the following functionality:
Users are no longer allowed to attempt to login indefinitely. Instead, after a specified number of tries - 5 - the account is disabled.
User accounts expire after 3 months.
The administrator can check out for each user a set of statistics: last login, time on site, registration date, and more.
Note: You can follow the instructions below only if you have installed MX Kollection 3 Professional.
In the first section of the tutorial you will add restrictions for the site users. In order to do so, you must modify the user's table structure:
Open your database management software and add the following fields to the user_usr table:
registrationdate_usr - type: date/time - stores the date when the user registered on the site.
ntries_usr - type: integer - stores the number of times the user has tried to login.
disabledate_usr - type:date / time - stores the date until when the account is disabled.
expiration_usr - type: date / time - stores the date when the account will expire.
Once you have done so, follow the next steps to add the account restrictions:
Open the site in Dreamweaver.
From the Insert bar > MX Kollection tab click the InterAKT Control Panel icon. Then select the Login Settings section.
In the Login Settings switch to the Restrictions tab. Configure the options as follows:
Tick the Use max tries feature checkbox to enable this feature.
In the Max tries text field enter 5.
In the Login Tries Counter Field drop-down menu select the table column where to store the attempts counter - ntries_usr
In the Disable interval text field enter the number of hours for which the account will be disabled. Enter 1.
In the Disable date field drop-down menu select the disabledate_usr field.
Tick the User expires checkbox to enable account expiration.
In the User expiration interval field drop-down menu select the expiration_usr table column.
In the Default expiration interval text field enter the number of days after which the account expires: 90.
In the Registration
date field drop-down menu select the registrationdate_usr
table column.
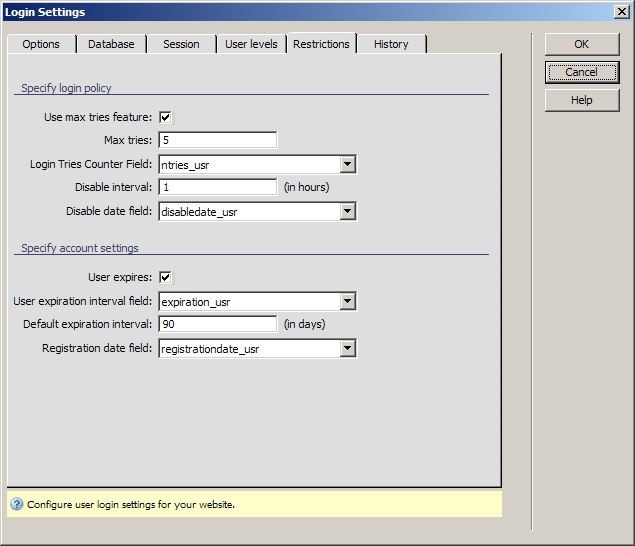
Click OK to apply the changes. All of the actions will be executed transparently, so you do not need to modify the login or registration page for these features to work.
In this section you will add user statistics to the site. This way, the site admin can see registration dates, the last login and logout date, and more.
To add this functionality you will have to add a new database table to store the information. The table to use is named logger_log and has the following structure:
id_log - the table primary key, uniquely identifies each entry in the table
idusr_log - foreign key column, stores the link to the user table.
ip_log - store the IP address of the user that logs in.
datein_log - store the date when the user logs in.
dateout_log - store the date when the user has logged out.
session_log - stores the session ID, for use within the login and logout tracking process.
Before displaying any statistics, you need to create them. Once the logging table has been correctly configured in the Control Panel > Login Settings section, the login and logout pages automatically start saving information, without any need to modify anything. To define the table options, follow these steps:
Open one of the site pages.
Go to the MX Kollection tab of the Insert bar and open the InterAKT Control Panel.
If you have updated the database tables after creating a section of the site you should clear the database cache. You can do so by going to the Database Caching and User Interface Persistence section of the Control Panel and clicking the Empty button.
Now click the Login Settings icon in the Control Panel. When it loads, switch to the History tab.
On this tab you can define which table to use and into which columns to store which information:
First off tick the Log account usage checkbox to enable this set of options.
In the Table drop-down menu select the logger_log table.
In the Primary key drop-down menu select the id_log table column.
In the Foreign key to users' table drop-down menu select idusr_log.
In the IP address drop-down menu select ip_log.
In the Last login date drop-down menu select datein_log.
In the Last activity date select the dateout_log column.
In the Session
drop-down menu select the session_log
column.
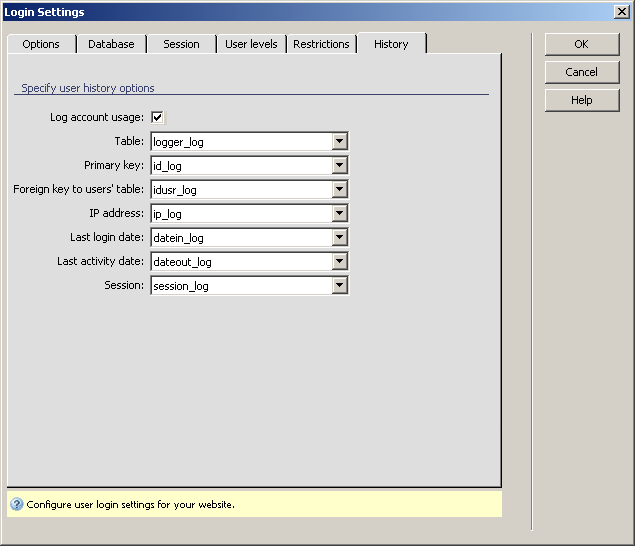
When you are done configuring the options, click OK to apply the changes. You will also have to upload the tng/tng.config.inc.xxx file to the testing server, as this is where the options are stored.
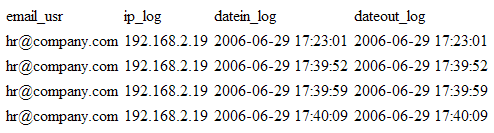
To test the history feature, login and logout with a valid account for a few times. You should see the number of entries in the logger_log table increasing. To add the site administrator check out the statistics in a more easy manner you will create a page that displays the information:
Create a new folder named admin
in the site root. In this folder create a page named statistics.xxx.
Note: Replace .xxx with the extension
required by your particular server model.
Open the page in Dreamweaver. To retrieve the information you will have to create an advanced recordset that joins information from the user and logger tables.
On the Server Behavior tab > Bindings click the Plus (+) button and select the Recordset (Query) option.
Click the Advanced button to manually enter a
SQL query. Name the recordset rsStats and then paste the following query
in the SQL text area:
SELECT * FROM user_usr LEFT JOIN logger_log ON id_usr = idusr_log
Click Test to preview the recordset results, and if everything is alright, click OK to create the recordset.
On the Insert bar > Application tab click the Dynamic Table icon. Configure it to use the rsStats recordset and display all records. Click OK to apply the command and create the table.
From the page remove all table columns except: email_usr, ip_log, datein_log and dateout_log. This will display a clean table with the action history for a specific user.
Save the page and upload it to the testing server.
Then press F12 in Dreamweaver to preview
it: