![]()
|
|
![]()
|
|
In order to quickly retrieve and display data from a table as a list with advanced capabilities, you can use the Create NeXTensio List Wizard. What this list offers above a standard dynamic table, is the possibility to filter and order the content, as well as automatically generated links to the corresponding NeXTensio form, allowing you to add a new record, update or delete an existing one much more easier. Ordering the list can be done after any of the fields that are displayed, simply by clicking on the column title. An arrow, pointing either up or down indicates the sort manner: ascending or descending.
The Create NeXTensio List Wizard is accessible from two locations:
This wizard will create several elements for you (for a complete list, check out below, at the end of the topic):
Before using the Create NeXTensio List Wizard, you should have a correctly configured testing site, as it will be required for the database connection setup step.
The wizard contains 4 steps, each of them addressing some settings:
To set the dialog box options for the first step of the wizard, follow the instructions below:
To set the dialog box options for the second step of the wizard, follow the instructions below:
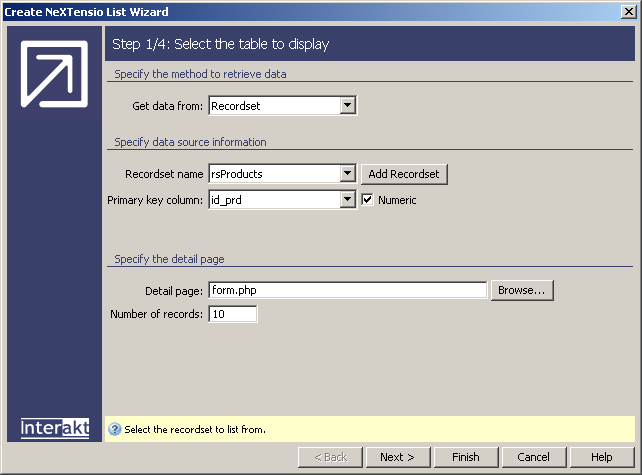
If in the Get data from
drop-down menu of the first wizard step, you selected Recordset,
the interface for the second step looks like this:
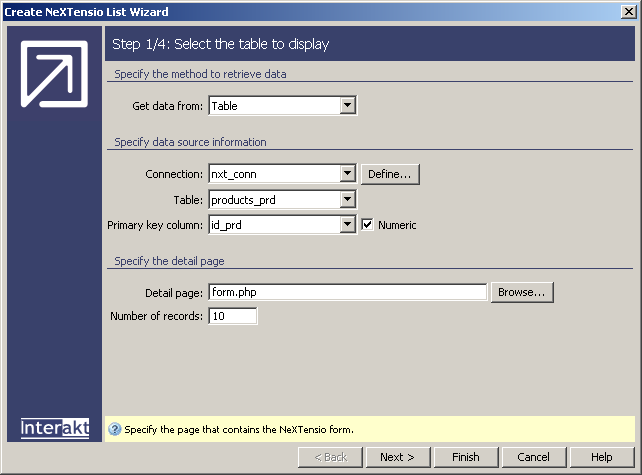
Note: If you selected Table, the
interface for the second step has some extra fields. Details upon these
additional fields and the interface itself are presented starting with
step 4. But read along for the common interface fields.
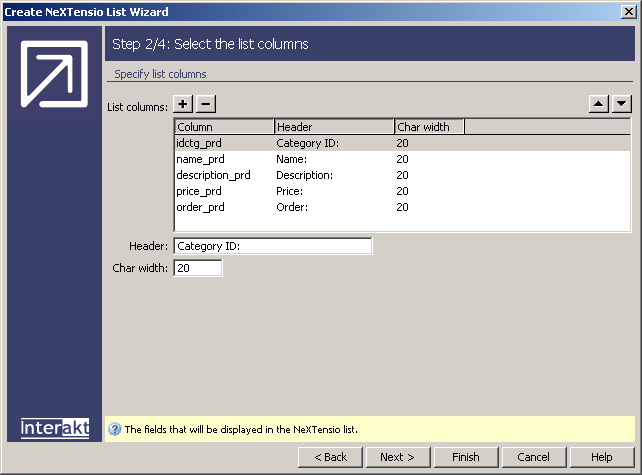
In the List columns grid, you can define what table columns will appear in the list. You can add or remove elements by clicking on the Plus (+) and Minus (-) buttons on top of the grid. Also, you can change the order columns are displayed in, by pressing the Up (^) and Down (v) buttons.
For each column there are some properties that
can be set. In order to access them, you have to select the list field
for which to set the properties from the grid. The available properties
are:
· Header
- this will be reflected in the list column title for the corresponding
field.
· Char
width - the maximum number of characters displayed is by default
20 (no matter the column type). You can set it as large as you want, but
the content of the respective fields cannot spread on multiple rows. So
if you set a large length, you will have to use the horizontal page scroll
to view all the information listed.
If in the Get data from
drop-down menu of the first wizard step, you selected Table,
the interface looks like this:
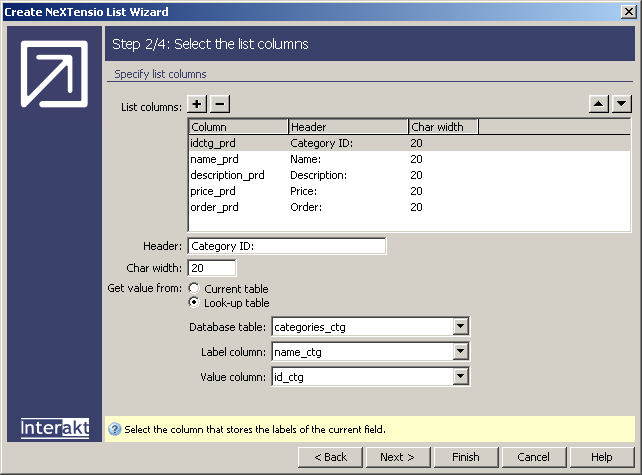
Another property that can be set for each field
(if you selected Table in the first step
of the wizard) lays in the Get value from
radio group. Select one of the radio buttons:
· Current
table - the value will be retrieved from the current table (the
one that contains the respective column). The three drop-down menus in
the lower part of the interface will be disabled.
· Look-up
table - by choosing this button, the value of the selected list
column will be retrieved from a related database table. If you choose
to use filters in the next wizard step, then the list columns that retrieve
their values from look-up tables have the Display
as property automatically set on Menu
(but you can change it if you want to). In this step, the following three
interface fields will be enabled. Read about their configuration below.
In the Database table drop-down menu select the table that contains the values you want to retrieve.
In the Label column drop-down menu select the column that stores the content you want to be displayed in the list.
In the Value column drop-down menu select the column that stores the value of the selected list field.
Click Next to continue with configuring the wizard.
To set the dialog box options for the third step of the wizard, follow
the instructions below:
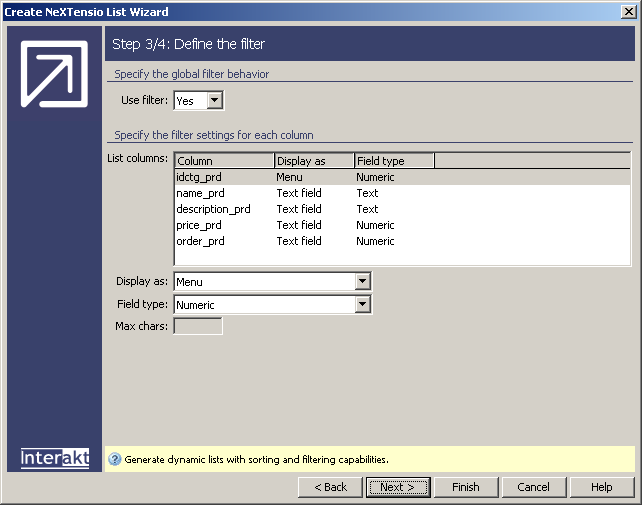
In the Use filter drop-down menu select whether or not you want to use filters in the NeXTensio list. If you choose No, the two drop-down menus under the grid will become disabled and no filter will be used in the list.
In the List columns grid, there are enumerated the table columns that appear in the list. You can set filter properties for each one of them.
If you chose to set filters
for the list columns, in the Display as drop-down
menu select one of the four possibilities of displaying the filter:
· Text
field - you must enter the text to filter the list column by.
· Menu
- the filtering options are displayed in a drop-down menu, allowing users
to select only certain values.
· Checkbox
- this option is suitable only for the columns with two values: 1/0, -1/0,
or y/n. In browser, if this filter is unchecked, all the rows are listed.
If checked, only some rows are listed, namely the ones that have a certain
value (1, -1, y) in the respective column.
· None
- select this option if you don't want a filter to be displayed for the
current column in the grid.
Note: when selecting a filter to be
displayed as a menu (after in step 1 you had chosen to get data from a
Table, and in step 2 to get values from a
Look-up table), a recordset will be automatically
created (named Recordset1 if there isn't
any other recordset with this name. If there is, it will be named Recordset2 etc). From this recordset, the menu
will retrieve the values it displays.
If in step 2 you selected to get values from the Current
table and you want to display the filter as a menu, under the Max chars text box there will be two buttons that
you can use to associate values to the menu filter: Menu
Properties and Add Recordset. Add
the recordset first.
In the Field type drop-down menu select one of the available options. It shows the way filter form fields are submitted. The available values depend on the element chosen in the Display as field.
The Max chars text box is only enabled for filters displayed as text fields. Enter the maximum number of characters accepted in the filter.
Click Next to continue with configuring the wizard.
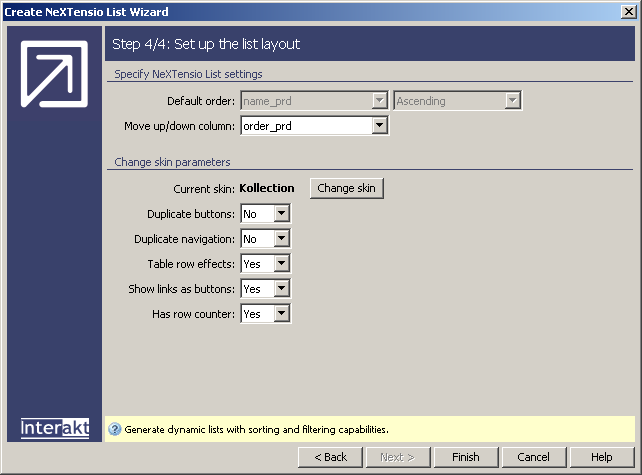
To set the dialog box options for the fourth step of the wizard, follow
the instructions below:
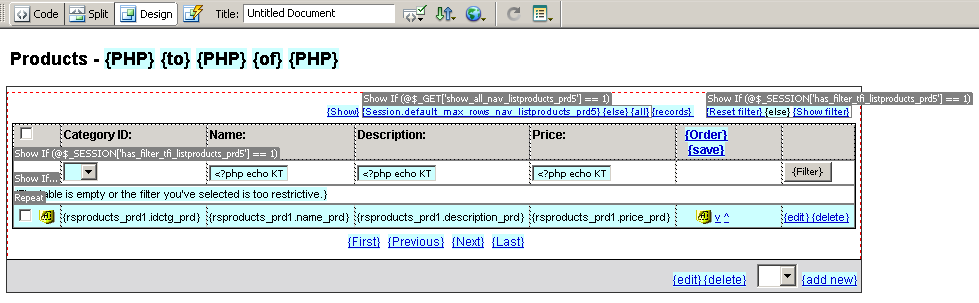
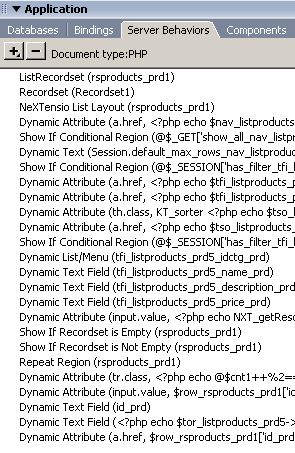
Once applied in a Dreamweaver page, the Create NeXTensio List Wizard will add the following elements in the Server Behaviors tab of the Application panel:
a recordset corresponding to the NeXTensio list.
a recordset corresponding to each menu filter, if you set any. See the note above to understand better how this works.
conditional and repeated regions.
dynamic attributes for the HTML form elements.
the NeXTensio List Layout server behavior.
This is how the Server Behaviors tab of
the Application panel looks like after applying
the wizard (with the settings above) in an empty page:
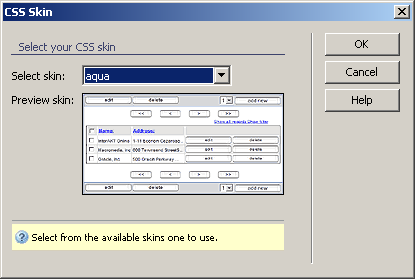
To change any of the list properties at a later time, you can double-click the NeXTensio List Layout server behavior (inserted by the wizard) or apply the Manage NeXTensio List Wizard command, accessed from the Insert bar -> MX Kollection tab.
To learn about the list's behavior in the browser, see NeXTensio
List browser behavior.