![]()
|
|
![]()
|
|
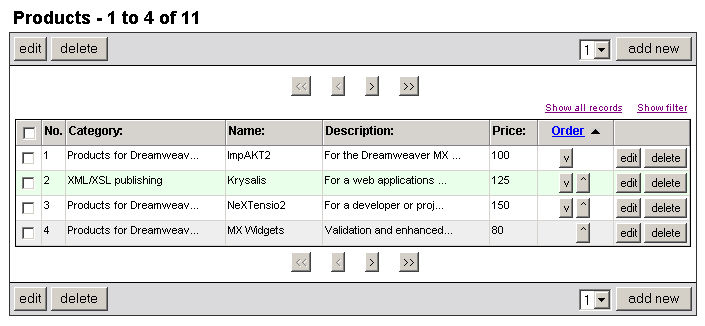
When using a NeXTensio list to display records from the database, you should completely understand all of the elements that are generated along with it and how they help ease navigation, as well as some of the most common operations.
As a basic example of a simple NeXTensio list,
let's consider the following image:
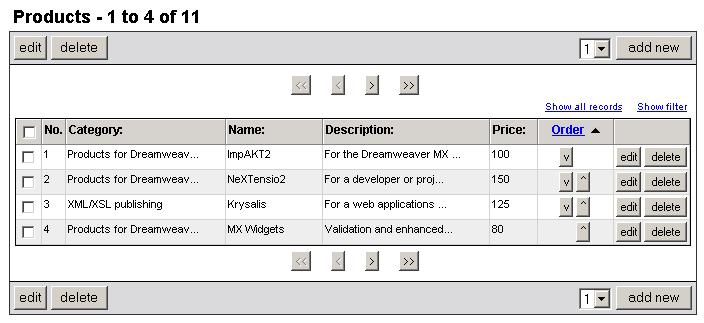
The elements that compose the NeXTensio list are:
The list title displays:
![]()
· the generic
name of the elements listed. This is taken from the table name (eliminating
the underscore "_" and what follows after it) or, when data
is retrieved from a recordset, the displayed list title is the name of
the recordset (in Title case).
· the counting
order of the first and last elements on the current list page out of the
total number of elements.
The list header and footer
contain buttons that can add an element (or more) and modify or delete
the selected elements. They are displayed both in the header and footer
only if in the Duplicate buttons drop-down
menu you selected Yes when creating the list.
The available buttons are:
· edit
- modify the selected records (multiple
update). By selecting certain records and then hitting the Edit
button in the footer (or header), you can edit multiple records at the
same time.
· delete
- delete the selected records (multiple delete).
· add
new - insert one or more new records in a database table at the
same time (multiple insert).
The drop-down menu besides this button has 3 default options: 1,
3 and 6. They
represent the number of records that you can choose to insert in one operation.
If none of the 3 options in the add new
drop-down menu are convenient to you, you can add another one. To learn
how to do this, see How to Edit the
Number of Records in a Multiple Insert.
Note: Both the single and multiple delete operations, although
they appear to take place the in list page, they are actually executed
in the form page, where the Insert/Update/Delete
transactions are included.
The navigation bar allows you to move through
the list pages: first, previous, next and last.
![]()
This bar is displayed both in the header and footer only if in the
Duplicate navigation drop-down menu you selected
Yes when creating the list.
There are 2 links displayed near the navigation
bar, on the right:
![]()
· The Show all records link displays in one list page
all the records retrieved. After clicking on it, it becomes Show
n records, n being the number of records you chose to be displayed
per page.
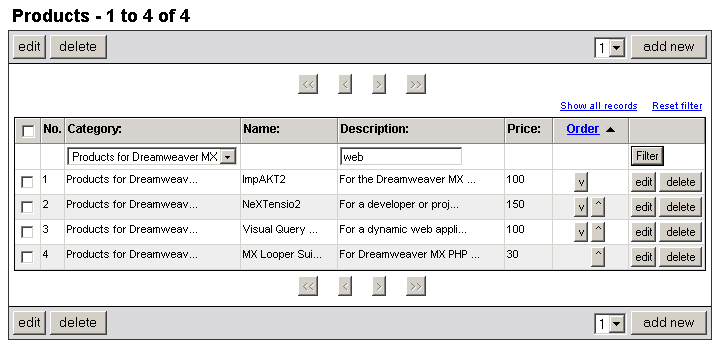
· The Show filter link displays in a table row the filters
set for each of the list columns. After clicking on it, it becomes Reset filter, which has 2 roles: when pressed,
it resets the filter and at the same time, it hides it.
![]()
The list table header
contains:
· the labels
specified in the Create
NeXTensio List Wizard for each table column;
· a checkbox
element (on the very left) that allows selecting all the records currently
displayed, in order to edit or delete them;
· an additional
column, No., that lists the current number
of a table row which displays list elements (it simply counts the elements
starting with 1). This order is not the order from the database table,
but one that is created when the elements are displayed. This column does
not appear if the Has row counter checkbox
was not selected in the Create NeXTensio List Wizard.
By using the filter, you can select elements with
certain characteristics out of the list. Filters can be set for none,
all or just some of the list columns (set in step
3 of the Create NeXTensio List Wizard).
· In a drop-down
menu filter, select one of the available options and all the records that
qualify will be listed.
· In a text
field filter, enter a sub-string, and all the records that, in that specific
table column, include in their values the typed sub-string, will be listed.
Note: Filters for date-type columns and for numeric columns
have some particular characteristics. You can read about them here: Filter dynamic data: NeXTensio list
filters.
Click the Filter button on the right of the filter row in order to make the records selection. The button is absolutely needed when the filter is a menu (or when at least one of the filters is a menu). When all the filters are displayed as text fields, you can simply hit Enter after typing in the filtering text.
An actual list table row
contains the following:
· a checkbox
in the first table column that allows selecting that row;
· the number
that identifies that row in the list table;
· the actual
data in that record;
· the edit button that allows updating the record corresponding
to that row;
· the delete button that
allows removing the record corresponding to that row.
Notice that when the mouse is over a row, if in the Table
row effects drop-down menu of the Create
NeXTensio List Wizard you selected Yes,
the row is highlighted (in green here, for the Kollection
skin). For the same skin, when a row is selected, it is highlighted in
purple.
Note: When deleting a row, the NeXTensio
list will continue to display the page from which that row was removed,
and will not redirect the view to the first page. The only exception is
when the row deleted is the only one on the last page. After removing
it, the list will display the new last page, namely the one that used
to be second to last (so that an empty page will not be shown after the
deletion).
If in the Move up/down column
drop-down menu you selected one of the numeric and unique table columns
available, you will notice a new column in the table list that contains
2 buttons on each row (except for the first and last rows), namely the
up and down arrows (the Order column in the
example given here). The first and last rows on a list page display only
one of the two buttons: the down arrow, respectively the up arrow.
The title of this column is shown as a link, and there is a little
black arrow next to the title (see the image above, at step 6). By pressing
this link, the records are displayed in the list table ascending or descending
(the black arrow indicates the ordering direction), in relation to that
field. The other column titles are not showed as links so you cannot order
the list items by other criteria since they are already displayed in a
specific order (given by the order column).
Note: When in the Move up/down column
drop-down menu you selected None and in the
Default order drop-down menu you selected
one of the available columns (set in step
4 of the Create NeXTensio List Wizard),
all the column titles in the NeXTensio list
are displayed as links. You can click on any of them if you want to order
the records according to that table column. The black arrow will show
you by which column the current order is made, and it will also imply
the direction:
Back to the up and down
arrow buttons: not only do they change the records order in the
list table (by moving them up and down in the list), but also in the database.
Let's say that in the first list page (the first image in this topic,
before step 1), you want to switch between them the records currently
on the second and third row. You can simply click on the up button on
the third row. The row that is moved is being highlighted (in green here):
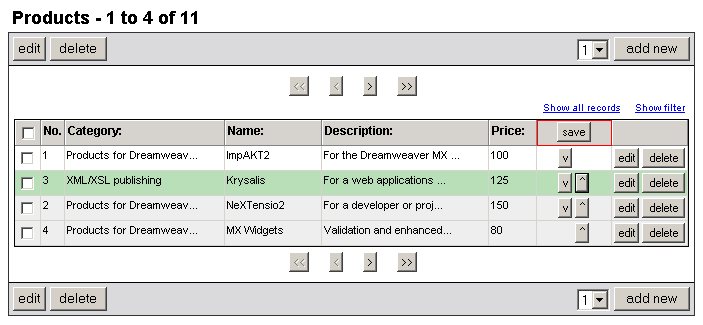
As you can notice, the two rows switched between them. Also, notice
that the list rows are not correctly numbered now (1, 3, 2, 4) and that
the column with the up and down arrows had its title replaced by the save button. This button appears after the first
move.
This phase in the ordering process (the rows switching in the list)
is the client-side part of the operation. The changes are not updated
in the database at this moment so that the page will not be loaded for
each and every order move you make.
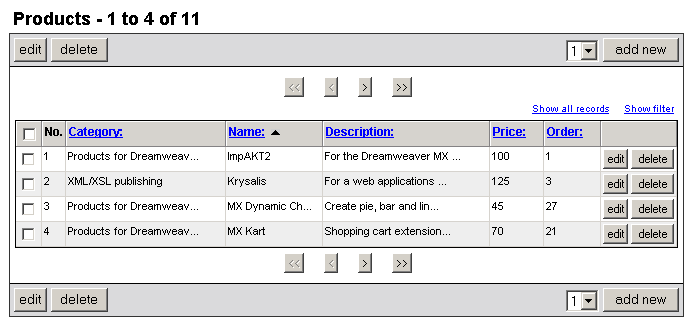
After reaching a final order, you can press the
save button and the change will be saved
in the database (the actual values of the order_prd
column will be changed). This is the server-side part of the operation.
Also, the rows numbering will be corrected, and the save
button will be replaced by the column title:
Note: If you want to switch two records between them, one being
the last on a page and the other being the first on the next page, you
can do this only when all the records are displayed.
If you attempt to do anything before saving the
rows/records moving, a message window will pop-up reminding you to save
or discard the changes:

The list elements that are displayed can be retrieved from more than one table. Simply change its filter element to menu and define a recordset. The list's query will automatically create a join with the respective table. This allows displaying actual names for foreign key fields, without the need of writing complicated queries by hand.