![]()
|
|
![]()
|
|
In this section of the tutorial you will build the page where users can reply to messages. The page will contain an insert form, but one which must also insert into the message_msg table details regarding about the parent message (i.e., the message being replied to) and also the original message (i.e., the message that started the thread).
The page used for replying to messages is called reply_message. It can be accessed by users from the view_message page, by clicking the Reply to message link. As you remember from a previous topic, the link also passes three URL parameters:
id_top - the ID of the topic to which the message belongs.
id_msg - the ID of the message that is being replied to. This will be stored as the parent ID.
id_init_msg - the ID of the message that started the thread. All the other messages in the same thread have an foreign key pointing to the initial message.
This page must also meet the following requirements (common for replies):
The parent message ID must be the one passed through the URL parameter.
Both messages must belong to the same topic (the idtop_msg for the new message will be the one retrieved from the URL parameter)
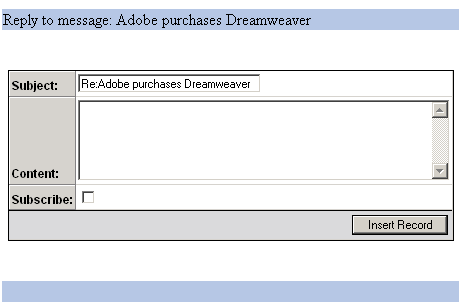
The reply message subject entry field must have as default value "Re: [old subject]". This way, replies are easily identified.
With these goals and requirements in mind, you will build the page following these steps:
Open the reply_message page in Dreamweaver.
The same page layout as for the previous pages is already created (if you used the files in the ZIP package delivered with this tutorial). The insert form will be placed in the main table's middle row (the one without a background color).
Before creating the form, you must create a filtered
recordset, that will retrieve the original message ID, based on the message
ID passed as an URL parameter. To create the recordset, click the Plus (+) button of the Bindings
Tab > Recordset (Query). Set the database connection to connBoard, and the table to retrieve data from
message_msg. To filter the records, select
in the filter drop-down menu the table's primary key (id_msg)
and set as condition equality with the id_msg
URL parameter, as seen below:
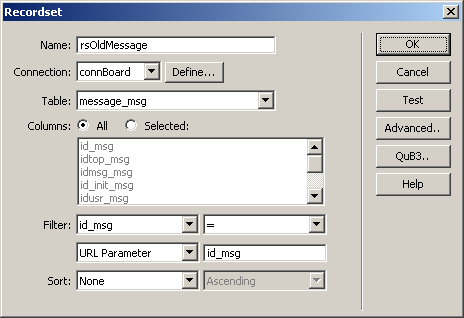
Click the OK button to create the recordset.
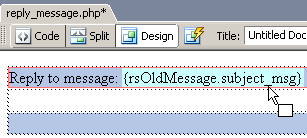
Drag the subject_msg
field from the rsOldMessage recordset in
the Bindings tab and drop it into the table's
first row, after the Reply to message: text.
Now place the cursor in the middle row and start the Insert Record Form Wizard. You can access it from the MX Kollection tab of the Insert bar. If you used the same wizard in the previous topic, most of the interface fields should already be filled in, due to user interface persistence.
The first step is already filled in: the connection, table name, primary key and redirect page are preserved from the last time you applied the wizard in the post_message page. The first step should look like this.
On the second step, each field still has its default value and field type configured as in the Post Message page. The following fields are already set up: idtop_msg, idusr_msg, date_msg, subject_msg, content_msg, subscribe_msg.
Select the subject_msg
field, and edit its default value. Click the InterAKT
Dynamic Data icon (the blue lightning bolt) to select the subject_msg column from the rsOldMessage
recordset.
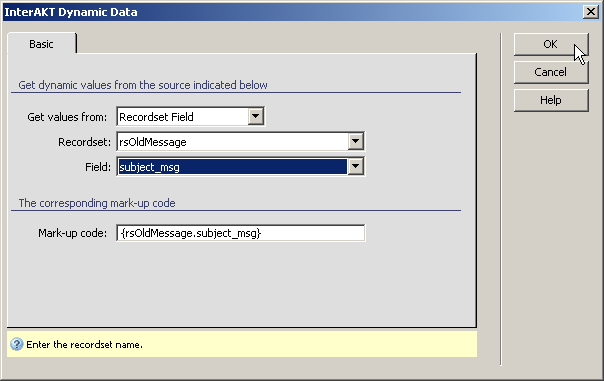
Once the dynamic value is added to the Default
Value text field, simply enter the "Re:" string before
the automatically generated mark-up code.

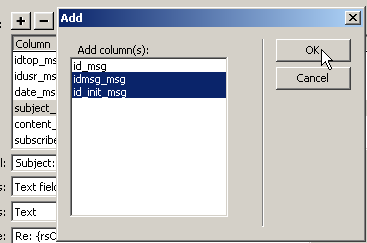
You need to add two more fields, if they are
not displayed in the grid: idmsg_msg and
id_init_msg. To add them, press the Plus (+) button on top of the grid and select
the fields from the list.
Configure them as follows:
· idmsg_msg
- Displayed as Text, Default value: id_msg
from the rsOldMessage recordset. Click the
InterAKT Dynamic Data icon (the blue lightning bolt) to select its value
from the recordset, without writing any code.
· id_init_msg
- Displayed
as Text, Default value: id_init_msg from
the rsOldMessage recordset. Click the InterAKT Dynamic Data icon (the lightning bolt)
to select its value.
Here is how step 2 of the Insert Record Form
Wizard should look like, after configuration:

Click Next to proceed to step 3.
In step 3 of the Insert Record Form Wizard, apply
validation rules on the transaction fields. Make all fields required,
except the Subscribe check-box. Also, all the foreign keys (idtop_msg,
idusr_msg, idmsg_msg,
id_init_msg) must be positive integers. Finally,
the date field should have the Datetime
format. Here is how step 3 should be configured:
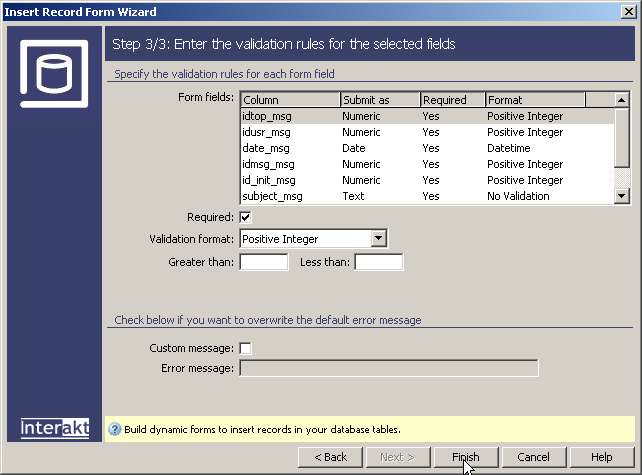
Once all fields are correctly set up, press the Finish button to close the wizard.
The wizard will generate the form in the row where
you placed the cursor, and all the server behaviors in the Server Behaviors
tab. You can change the Insert Transaction's behavior and fields at a
later time (if needed) by double-clicking the server behavior with the
same name.
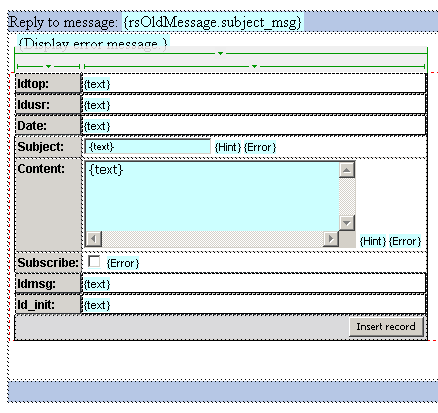
Since the idtop_msg, idusr_msg, date_msg, idmsg_msg, and id_init_msg should not appear in the form, select these fields in the Dreamweaver page and hit the Delete key. They are not removed from the Insert Transaction, but only from the HTML form.
The reply to message page is completed, and you can save and upload
it to the server now. It cannot be accessed directly, because of the Restrict
Access to Page server behavior applied to it. Instead, access the home
page, enter your login information, and then post a reply to an existing
message.
After you complete the reply_message page, the basic structure of the Discussion Board is finished. Users can view discussion topics, the messages under each topic, they can register an account with the Board, and authenticate using their login information, and then post new messages or reply to existing messages.
In the next section of the tutorial, you will improve the existing Discussion Board by allowing users subscribe to certain message threads, and receive e-mail notifications when a reply has been posted to one of their messages.