![]()
|
|
![]()
|
|
In this 'how to' tutorial you will learn how to use NeXTensio to implement a "created on"/"modified on" mechanism for your forms. The use for this lies mostly when working with records that can be updated. The creation date, as well as the last modification date must be stored in the database.
For the purpose of this tutorial, a simple database structure will be
considered, using only a table that stores information about articles
as records. The table structure is as shown below:
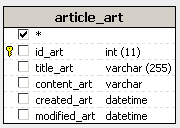
Note: The database diagram in the image above was built with MX Query Builder (also referred as QuB) to better illustrate the database structure. You do not need to build it in order to complete this 'how to' tutorial.
As you can notice in the image above, the creation and modification dates are stored as different fields. One of them (the creation date) will have to be automatically completed when an article is added, and the other, when the record is updated (the modification date). The modified field will store only the date of the last change.
The database dump for the site can be found inside the downloaded package, in the \tutorials\_HOW_TO\Created on - Modified on\db\ folder, as sql and mdb files. Import these files into an existing database or create a new one.
For the purpose of this tutorial, no particular site design is needed, and the only files that will be created will be the ones storing the NeXTensio list and form. Create a file called index, in which you will generate the NeXTensio list. Another file, named form, will be automatically created and that is where the NeXTensio form will be stored.
The file structure will be similar to the one shown in the image below:
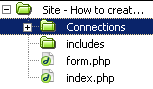
Besides the files that you will be actually working with, some files and folders are automatically generated by Dreamweaver or the MX Kollection - like the includes folder, that stores files relevant for MX Kollection 3.
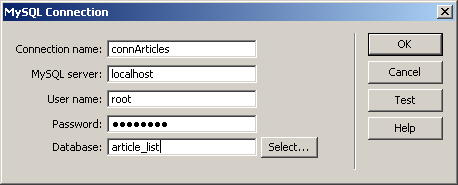
Once you have created the database and its table, open the site's index and create a new Dreamweaver
database connection. Configure it to connect to the newly created database:
To start creating your application, move on to the next step.