![]()
|
|
![]()
|
|
After applying the Create NeXTensio Form Wizard, you can notice in the Server Behaviors tab the server behavior that is added, namely the NeXTensio Form Layout one. You cannot find it in the MX Kollection 3 menu as it can only be used after applying the Create NeXTensio Form Wizard, which adds it to the server behaviors list of the page.
You can use the NeXTensio Form Layout server behavior (by double-clicking on it) to alter the NeXTensio form properties (mainly the visual elements like the skin and the buttons) at a later time.
The server behavior contains only one tab and it looks similar to the
image below:
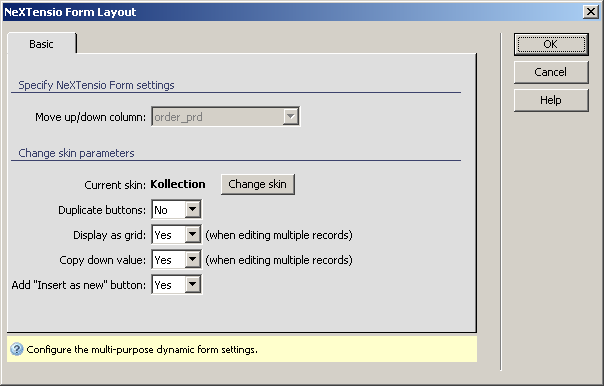
To set the dialog box options, follow the next steps:
In the Move up/down column read-only drop-down menu you can only view the table column selected previously (in the Create NeXTensio Form Wizard) for the records order. This is the column on which the auto-increment trigger acts.
The Current skin used in your site (in all the pages included, not only the current one) has its name displayed in bold text. You can change it by clicking on the button next to it, Change skin. For more details, read CSS Skins.
In the Duplicate buttons drop-down menu select whether or not you want the form buttons to be displayed both in the form's footer and header, or only in the form's footer.
In the Display as grid drop-down menu select Yes if you want the records to be shown in a grid and No if you want them displayed separately.
In the Copy down value drop-down menu select Yes if you want the value to be extended and populate the cells below it, and No if you don't want it to propagate.
In the Add "Insert as new" button drop-down menu decide whether or not you want a button like this in your form (insert a new record starting with the values stored in another one).
Click OK when are done altering the NeXTensio form.