![]()
![]()
In this tutorial topic you will create the basic NeXTensio form that works with the NeXTensio list created earlier to allow adding, editing or removing articles.
The form will act on the article_art table, and aside the fields the user must enter, it will automatically fill in some values:
date_created_art - this column value is automatically set to the current date and time. It happens only once, when adding the article.
date_modified_art - this column value is automatically set to the current date and time. It happens when adding and editing the article (adding an article means that it is also edited).
created_by_art - it stores the ID of the currently logged in user, who added the new article.
modified_by_art - it stores the ID of the currently logged in user, who edited the article.
assigned_to_art - it is set on insert only, and stores the ID of the user who created the article - for draft. This field changes when the Assign to page is used.
status_art - it is set to draft when adding a new article. The article state is only changed when it is assigned or approved. The update transaction created by the NeXTensio Form must not change the existing state - draft, assigned or approved.
To create the form, follow the next steps:
Open the admin/form page in Dreamweaver.
Go to the MX Kollection tab of the Insert bar and click the Create NeXTensio Form Wizard icon. The wizard is divided in four (4) steps.
In the first step define the table to insert/edit
values into. Thanks to the user interface persistence, these fields should
be already filled in. If you do not have the user interface persistence
turned on, configure the fields as follows:
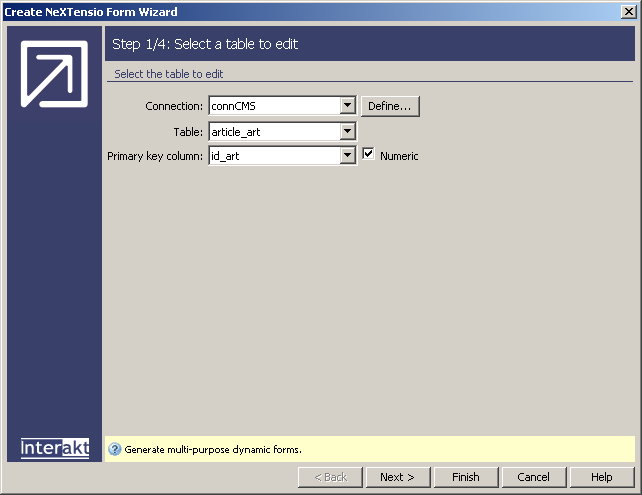
In the Connection drop-down menu select the connCMS database connection.
In the Table drop-down menu select the article_art table.
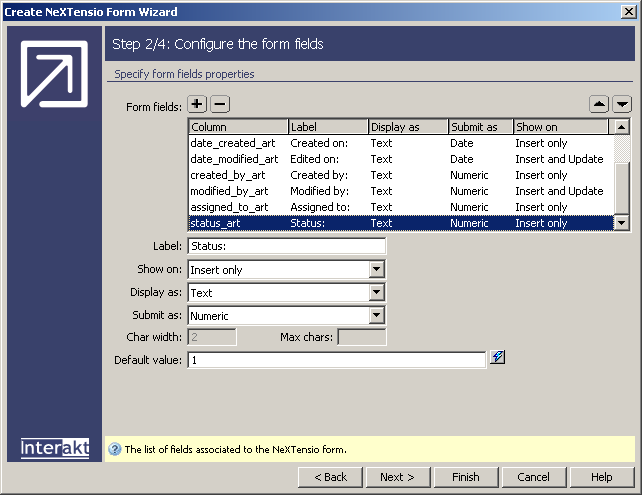
In the second step configure the form fields.
You can add and remove fields by selecting them in the grid and using
the Plus (+) and Minus (-)
buttons. Because of the user persistence you should have to add all fields
except the assigned_to_art and status_to_art.
For the idtop_art field:
Because of the user persistence it is configured to be displayed as a dynamic menu. Make sure that the Label text box contains Topic:.
Leave the title_art field at its default values.
For the content_art field select in the Display as drop-down menu Text area.
For the date_created_art field:
In the Label text box enter Created on:.
In the Show on drop-down menu select Insert only.
In the Display as drop-down menu select Text. This will make it non-editable.
In the Default value text box enter {NOW_DT}. This is a dynamic mark-up that will be replaced at run-time with the current date and time.
For the date_modified_art field:
In the Label text box enter Edited on:.
In the Show on drop-down menu select Insert and Update.
In the Display as drop-down menu select Text. This will make it non-editable.
In the Default value text field enter {NOW_DT}. This is a dynamic mark-up that will be replaced at run-time with the current date and time.
The created_by_art field is set to use a dynamic menu thanks to the user interface persistence:
In the Show on drop-down menu select Insert only.
In the Display as drop-down menu select Text.
In the Default value text box enter {SESSION.kt_login_id}. This is a dynamic mark-up that will be replaced at run-time with the user ID retrieved from the session variable.
The modified_by_art field is set to use a dynamic menu thanks to the user interface persistence:
In the Show on drop-down menu select Insert and Update.
In the Display as drop-down menu select Text.
In the Default value text box enter {SESSION.kt_login_id}. This is a dynamic mark-up that will be replaced at run-time with the user ID retrieved from the session variable.
For the assigned_to_art field:
In the Show on drop-down menu select Insert only.
In the Display as drop-down menu select Text.
In the Default value text box enter {SESSION.kt_login_id}. This is a dynamic mark-up that will be replaced at run-time with the user ID retrieved from the session variable.
For the status_art field:
In the Show on drop-down menu select Insert only.
In the Display as drop-down menu select Text.
In the Default value text box enter 1.
When you are done setting up the fields, click Next to move on.
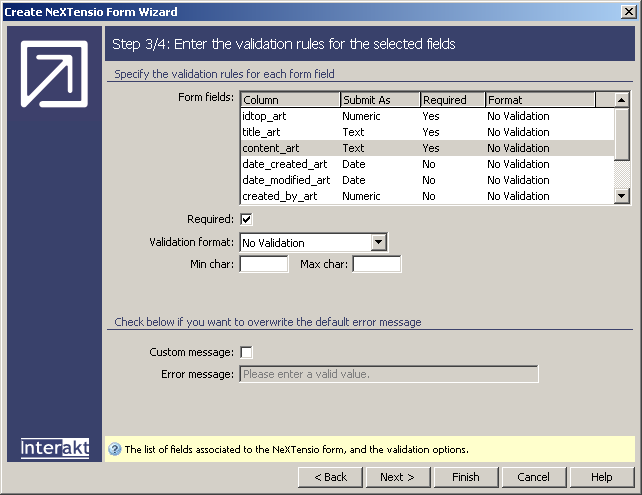
In the third step define validation rules for
the fields. Since the only ones that are available to the user are the
topic, title and content, make them required. Select each of them in the
grid and check the Required option below:
In the last step set form specific options. Just
select No for all the options in this step:

When you are done with all wizard options, click Finish to close the wizard and apply the changes.
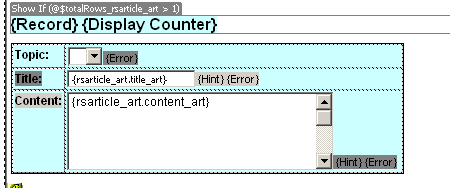
The wizard will add HTML code for the form, as well as insert, update and delete transactions. From the HTML form you need to remove the fields that were marked to be displayed as text. Remove the entire row for the Created on, Edited on, Created by, Modified by, assigned to and status fields. Removing these fields from the form will not remove them from the transaction.
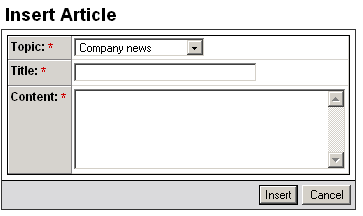
After removing these fields, the form will look like the following one
in Dreamweaver:
You can access the form from the list - by logging in with an author
account and clicking on the add
new button, or by entering its URL directly in the browser address
bar. Either way, when viewed in the browser it should look like:
When adding or editing content, authors and editors are, at least for now, provided with a very rudimentary tool - a simple textarea. If rich content is to be added, either everybody will be forced to learn HTML, or you will use an online visual HTML editor. In the next topic you will enhance the form by replacing the textarea with the KTML 4 control.