![]()
![]()
In this topic you will learn how to add basic user authentication to your CMS. Not all aspects of the user authentication can and will be covered. For a more thorough tutorial on user authentication, click here.
This topic though explains how to set up the unified login settings and how to create the user login page. The user registration page can be created easily using the User Registration Wizard, for both users and editors.
MX Kollection 3 uses an unified set of authentication options. This way you only need to define or change the table, columns, access levels and redirect pages once, and it takes effect in all pages and behaviors that use it. Open the admin/index page before going any further to activate the Insert bar. These settings can be accessed from the MX Kollection tab of the Insert bar -> InterAKT Control Panel -> Login Settings.
The user interface is divided in four (4) tabs. Configure them as shown below.
The Options tab - define
basic authentication options:
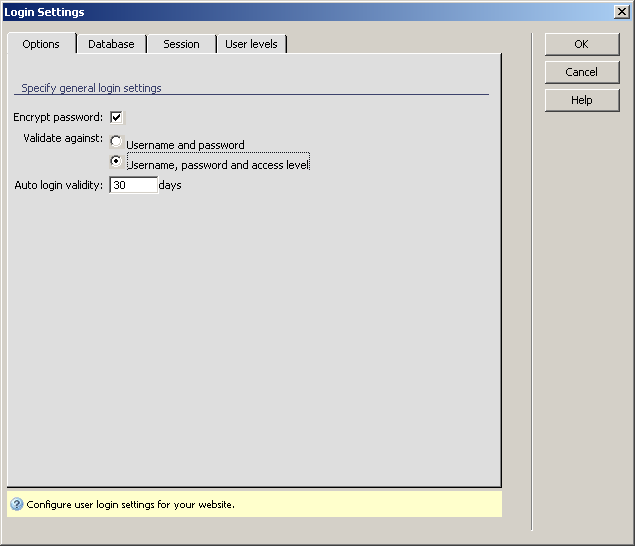
Check the Encrypt password option. Passwords will then be stored encrypted in the database.
In the Validate against radio group select the Username, password and access level radio button.
The Auto login validity value sets how much will a user be remembered on the site. Use the default 30 days period.
The Database tab - define
the table columns to use for user information:
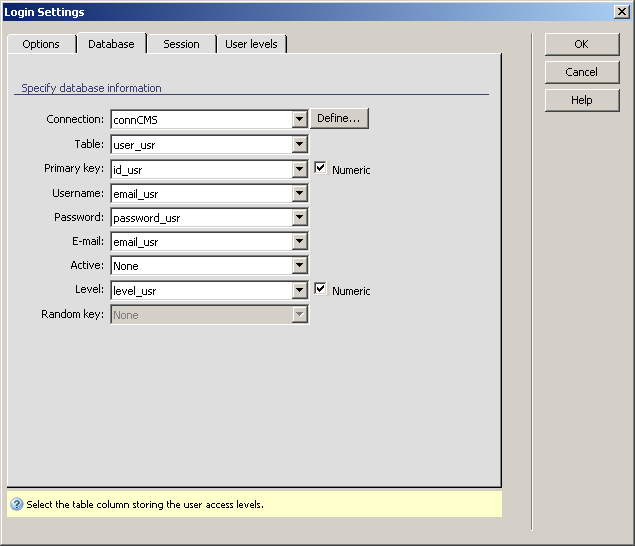
In the Connection drop-down menu select connCMS.
In the Table drop-down menu select the user_usr database table.
The Primary key drop-down menu will detect what the table primary key is. If it does not, or you have a different primary key select it in the drop-down menu. The column to select for this table structure is id_usr.
In the Username drop-down menu select the email_usr table column.
In the Password drop-down menu select the password_usr table column.
In the E-mail drop-down menu select the email_usr table column.
If you want to allow accounts with activation you must also specify a column in the Active drop-down menu to store the account active state.
In the Level drop-down menu select the level_usr table column.
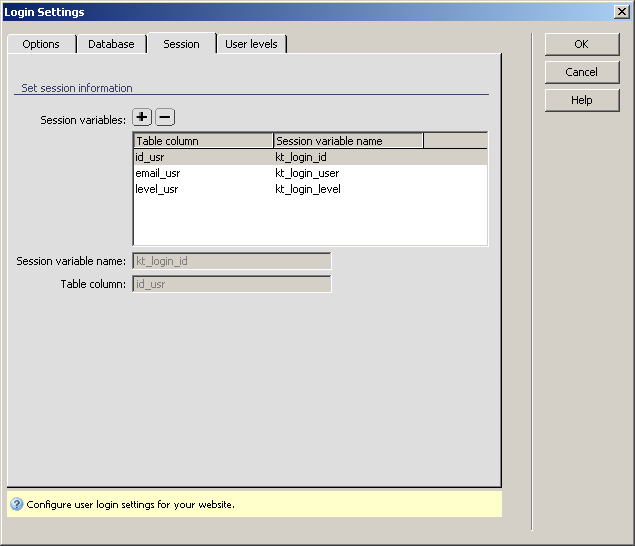
The Session tab - define
what session variables will be created when the user logs in. By default,
three variables are created - for the user ID, username and access level.
You can add more if you need them, but it is beyond the scope of this
tutorial.
The User levels tab
- define
redirect pages and access levels:

In the Login page text box click Browse and select the index file within the admin folder.
In the Default redirect on success text box click Browse and select the list file within the admin folder.
In the Default redirect on fail text box click Browse and select the index file within the admin folder.
Click the Plus (+) button above the User levels grid to define a new access level. In the pop-up dialog box enter the level: 1. Repeat the same step to add levels 2 and 3.
When you are done configuring the authentication options, click OK to close the user interface and save the settings.
After setting up the login options, you can proceed and create the login form. It will allow users enter their credentials and access the administration area. To create this form you will use the Login Form Wizard from MX Kollection:
Open the admin/index page in Dreamweaver.
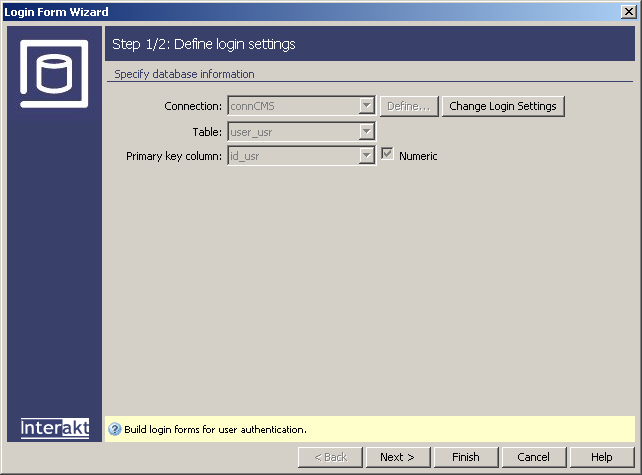
Go to the MX Kollection tab of the Insert bar and click on the Login Form Wizard icon. The wizard is divided into two steps which you must configure.
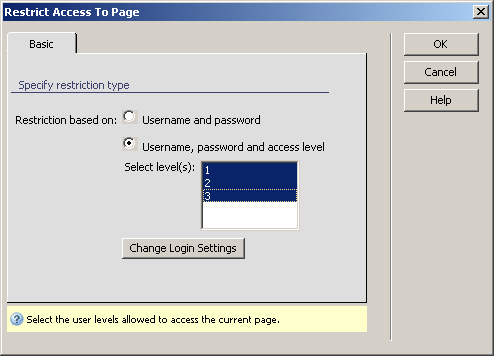
The first step of the wizard is mostly informative.
It displays some of the options selected in the unified login settings.
If you need to change them, or if you have not yet set them you can always
click the Change Login Settings button to open
the InterAKT Control Panel.
In the second step of the wizard you can select
some login specific options:
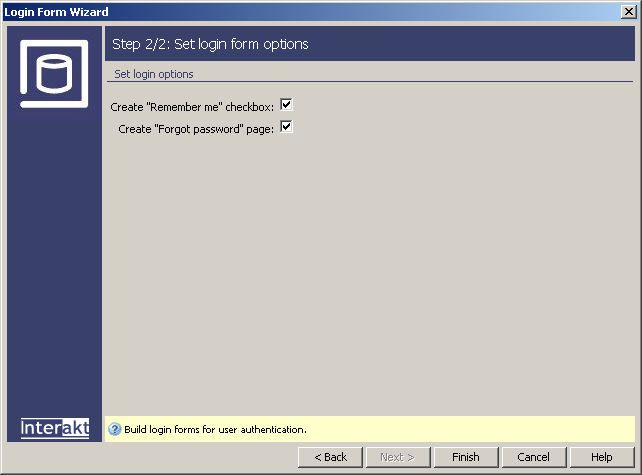
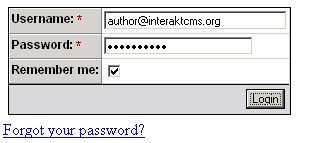
Check the Create "Remember me" checkbox option to allow users remain logged in for a specific period of time.
Check the Create "Forgot Password" page to generate an additional file that generates a new password and sends it through e-mail when needed.
When done, click Finish to create the login form.
The wizard will add the HTML form and the application logic to handle
the login process. If you want to test out the page, save it and press
F12 to preview it in a browser.
Use one of the pre-defined
user accounts to test it out: