![]()
![]()
The application to be created in this tutorial is divided into two sections:
Front-end - in this section you will learn how to create the site's publicly accessible pages - pages to display topics, article titles and entire articles.
Administration section - in this section you will learn how to create pages that allow administrators manage the entire site - from content to users and work flow.
The application will allow users to:
View the articles organized in topics. From a vertical navigation menu the user will be able to click on a topic name to see all articles within.
See the list of articles associated with a certain topic.
Read a selected article (in rich format).
Create a user account. Users are of two types: authors and editors. Authors can post new articles to the site and can manage their own articles. Editors have the job of reviewing author submitted articles and approve or reject them.
Based on the article status, certain users can perform certain actions:
If the article is a draft, only the author can edit it. All others can read it.
Once completed, the article is assigned to an editor. In this mode, only the reviewer can edit it; all others can read it.
After the review, the article status is set to approved. Nobody will be able to edit it, and it will be featured in the site front-end.
Only the webmaster can delete articles.
When an article is edited, the date and time of the modification, as well as the user who changed it are stored in the database.
The database used for this tutorial is relatively simple, using only
four tables, as shown in the diagram below:
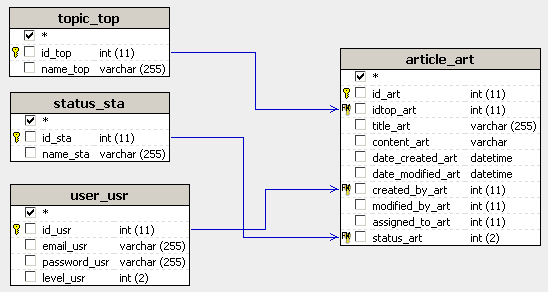
Note: The database diagram in the image above was built with MX Query Builder (an InterAKT product, also referred as QuB) to better illustrate the database structure. You do not need to build it in order to complete this tutorial.
topic_top - this table stores data about the article topics:
id_top - table primary key; it uniquely identifies each topic.
name_top - topic title.
status_sta - this table stores data about the possible article states. Possible values are: 1 - Draft, 2 - Assigned for review and 3 - Approved. These values are inserted by default.
id_sta - table primary key; it defines the state value.
name_sta - state denomination; it corresponds to the id_sta value as explained above.
user_usr - this table stores information about the site users:
id_usr - table primary key; it uniquely identifies each user.
email_usr - it stores each user's e-mail address. This is also used as username.
password_usr - stores each user's password. Passwords are stored encrypted in the database for security reasons.
level_usr - stores the user access level. Possible values are: 1 - author, 2 - reviewer, 3 - webmaster.
article_art - this table stores information about the site articles:
id_art - table primary key; it uniquely identifies each article.
idtop_art - foreign key to the topic_top table; it's used to define to which topic the article belongs.
title_art - article title.
content_art - article body. This value will be inserted into the database using a rich HTML editor.
date_created_art - the date and time when the article was created. Its value is added by default when the article is created as the system date and time.
date_modified_art - the date and time of the last modification made to the article. Whenever an article is edited, this value is adjusted to the current system date and time.
created_by_art - ID of the user that created the article.
modified_by_art - ID of the user that last modified the article.
assigned_to_art - ID of the user that has the article assigned for an operation. This field contains the same ID as the author if the article is still a draft, the ID of a reviewer if article is assigned for review, or the ID of the webmaster if the article has been approved.
status_art - article status; it is foreign key to the status_sta table.
The database script offered in the package
contains several records, to help you get started. Among these there are
some default user accounts:
|
Username |
Password |
|
webmaster@interaktcms.org |
root |
|
author@interaktcms.org |
root |
|
author2@interaktcms.org |
root |
|
editor1@interaktcms.org |
root |
|
editor2@interaktcms.org |
root |
In order to create this application you will have to define a file structure
similar to the one below:
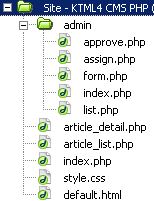
index - the main application file. It will display all pages in the front-end.
menu - displays the list of topics as links.
article_list - displays the list of articles in a topic.
article_detail - shows the full selected article.
admin/index - contains a login form.
admin/list - displays the entire article list, created with NeXTensio.
admin/form - displays the article management form; it allows adding, editing or removing an article.
admin/assign - allows authors to assign an editor for review.
admin/approve - approve an article for publishing.
style.css - Cascading Style Sheet file that contains style rules for the site pages.
default.html - file containing the content to display when no topic is selected.
To quickly create a similar file structure, unpack the downloaded .zip file from the \tutorials\your_server_model\CMS\
into the root of your Dreamweaver site.
Note: When locating this path, replace "your_server_model"
with the server model you are using.
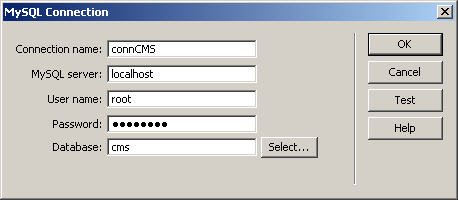
Before starting to work on the actual pages, you must define a Dreamweaver database connection. Open one of the site
pages, and go to the Databases tab -> Plus (+)
and select the option that creates a new connection. Configure it with
your particular details:
After creating the database and file structure, a Dreamweaver site and a database connection, you can move on and start creating the actual pages.