![]()
![]()
In this tutorial topic you will build the page that retrieves and displays the list of articles for a selected topic. This page is loaded when the user clicks on a menu link, and filters the articles by the topic ID passed as parameter. The list will display the article title, the first 100 characters in the article and a link to the full article.
The steps to create this page are:
Create a filtered recordset that retrieves article information.
Display the dynamic data on page, with the appropriate formatting.
To display the article list you must first retrieve information about existing articles from the database. The articles to retrieve must meet two conditions:
First they must belong to the selected topic - the topic ID must match the passed URL parameter.
The articles must have been already approved. Articles that are set as draft, or are in review must not be displayed.
To build this recordset you will use MX Query Builder (also known as QuB) which allows visual definition of queries:
Open the article_list page in Dreamweaver.
Go to the Bindings tab > Plus (+) >Recordset (Query).
Now click on the QuB3 button to load the QuB Visual Recordset interface. Configure it as explained next:
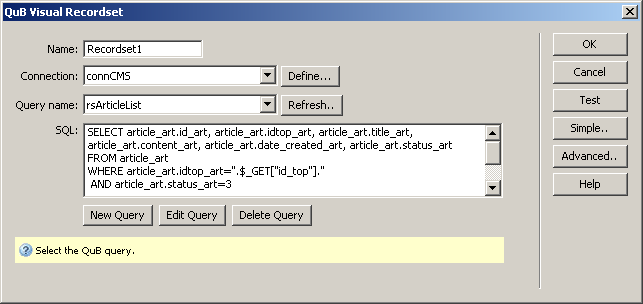
In the Name text box enter the new recordset name: rsArticleList.
In the Connection drop-down menu select the Dreamweaver database connection created earlier: connCMS.
Click the New Query button to define a new query. In the pop-up dialog which asks for a query name, enter the same name as for the recordset: rsArticleList.
The main QuB interface is web based, and it loads inside your system default browser. All interface components are explained here.
To create the recordset follow the next steps:
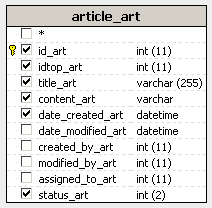
In the Tables section,
mark the checkbox next to the article_art
table to add it to the query:
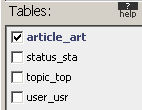
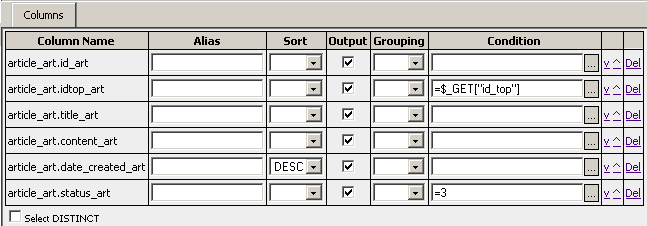
In the main area check the option next to
each table column to retrieve. Select the columns as shown in the image
below:
You can define conditions in the Columns area, by clicking on the ... button next to the Condition text box for each desired field. In this manner you will define the two before mentioned conditions.
Click the ... button
next to the Condition text box for the idtop_art field. Configure the pop-up window:
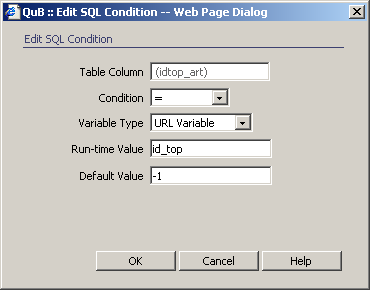
In the Variable Type drop-down menu select URL Variable.
In the Run-time Value text box enter id_top.
In the Default Value text box enter -1.
Click OK to close the user interface.
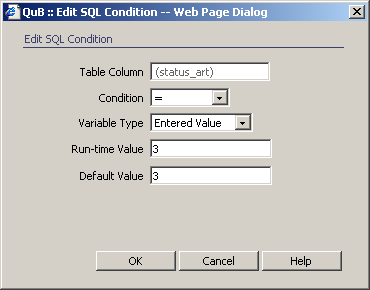
Next define a similar condition for the status_art column. Instead of URL
Variable use Entered Value, and for the
Run-time and Default
values enter 3:
The last thing to do is to sort articles by the creation date. Newer articles should be displayed first. To achieve this, in the Sort drop-down menu next to the date_created_art column select DESC.
The list of columns and the conditions applied
to each field are displayed in the Columns area:
When you are done setting up the options, in the Query menu select Save, then Close.
Back in Dreamweaver,
to use the query you've just created click the Refresh
button. The SQL textarea (until now, empty)
will display the SQL code for the recordset. Click OK
to create it.
The new recordset is displayed in the Bindings tab, and can be used like any other - you can drag its fields onto the page or double-click to edit it.
For the page to be enticing for the visitor, you will display the article title, the first 100 characters of the article body and a link to the article detail page:
Drag and drop the title_art field from the Bindings tab onto the page. Select the dynamic text added to the page, and from the Format drop-down menu in the Property Inspector select Heading 3.
Create a new paragraph after the title: place the cursor after the dynamic text and press Enter/Return.
Drag and drop the content_art field from the Bindings tab in the newly created paragraph. This will result in displaying the entire article - not what is desired. To reduce the number of characters to display, you must make some changes:
With the content_art dynamic text selected switch to Code view. The piece of code that retrieves and displays the recordset field will be highlighted
You need to change this line by applying two functions on the dynamic value: one that removes the HTML tags, and one that cuts what is above 100 characters. The new code is:
For PHP:
<?php echo strip_tags(substr($row_rsArticleList['content_art'],0,100));
?>
For ColdFusion: because there is no built-in function that will strip the HTML tags from the content, and simply displaying a section of it would cause broken HTML, on ColdFusion you must display the entire article content. This means that you do not have to change anything, just drag and drop the content_art field of the recordset onto the page.
For ASP_VBScript:
<%=left(KT_strip_tags(rsArticleList.Fields.Item("content_art").Value),100)
%>
For ASP and ColdFusion you also must add a new line on top of the page that will include the includes/common/KT_functions.inc file:
For ASP_VBScript:
<!--#include file="includes/common/KT_functions.inc.asp"
-->
Switch back to Design view.
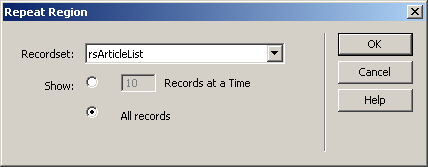
Now the page displays information for the first article only. To display the remaining articles as well, you must apply a Repeat Region server behavior, in a similar manner to the menu page:
Press Ctrl+A to select the entire page content.
Go to the Application
tab of the Insert bar and click the Repeated
Region icon. Configure the server behavior to use the rsArticleList
recordset and to display all records:
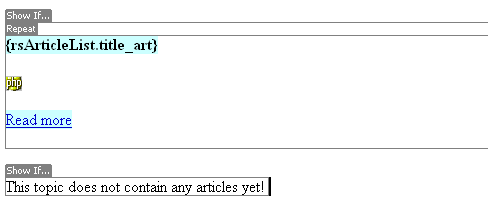
Press Ctrl+A
to select the entire page content. Go to the Server
Behaviors tab > Plus (+) > Show Region
and select the Show If Recordset Is Not Empty entry. In
the dialog box that is displayed select the rsArticleList
as the recordset to check:

Next place the cursor after all page content, not only after the last text and type: This topic does not contain any articles yet!. Select the text and apply the Show If Recordset Is Empty server behavior from the Server Behaviors tab > Plus (+) > Show Region. Configure it as the previous one.
In
Dreamweaver, the page should now look like the
image below:
Note: The exact appearance depends on your particular server
model.
Before testing the page you must add it to the main page. Content on the main page is loaded dynamically, based on the mod URL parameter, with a Server-Side Includes From List server behavior. This server behavior allows defining a list of URL parameter values and filenames to load:
Open the index page in Dreamweaver.
Select the Content for id "content" Goes Here default text and remove it.
Go to the Server Behavior tab > Plus (+) > MX Kollection > Server-Side Includes and select the Server-Side Includes From List entry.
The user interface displays the existing included
files in a list, and allows adding or removing items with the Plus
(+) and Minus (-) buttons. To add a new
entry, click the Plus (+) button, then define
its properties in the fields below the list:
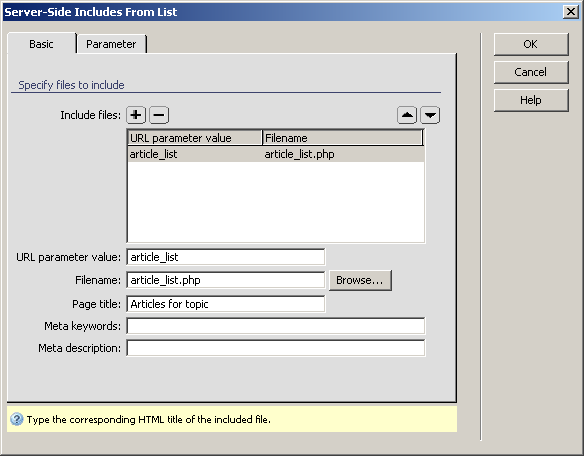
In the URL parameter value enter article_list (the one set in the menu links).
For the Filename click the Browse button and select the article_list page in the site root.
In the Page title text field enter Articles for topic.
The user interface has a second tab - Parameter
- where you can define the URL parameter name used to pass instructions
to the dynamic include. By default it is set to mod, and this value will
also be used throughout the tutorial.
Note: If you want to use another URL parameter, change it on
this tab of the user interface, and then replace it everywhere it is used
in the tutorial.
Click OK to apply the server behavior and close the user interface.
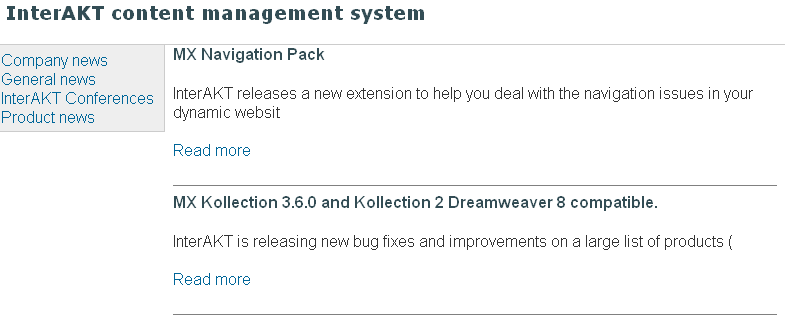
Save the page and press F12
to preview it in a browser. To try out the article list, select one of
the menu topics - if it has articles, they will be displayed:
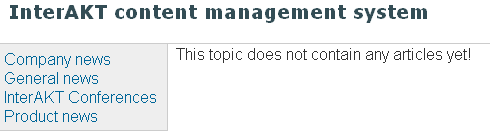
If you select a topic that does not contain any articles, the fail-safe
mechanism will work, and you will see something similar to this:
When the index loads for the first time, or when no value is passed for the mod parameter, at this point you only see the menu, and blank space in the right. To correct this you must define another included file that will be displayed when no value for mod is passed:
Double click the Server-Side Includes from List server behavior to edit it.
In the Basic tab click the Plus (+) button to define a new included file. Configure the fields as follows:
Leave the URL parameter value text box empty.
For the Filename click the Browse button and select the default.html page in the site root.
In the Page title text field enter Welcome to the InterAKT Content Management System.
Click OK to apply the changes and close the user interface.
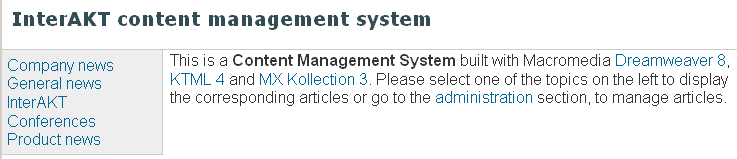
Now when you first load the site index you no longer get an empty screen,
but a nice welcoming note:
In the next topic of the tutorial you will complete the application front-end by creating the article detail page and the main page.