Create home page
Before starting to build the main page for your site's front-end, you
should already have completed the following topics of the tutorial:
If you skipped one of these sections, you should do it now, as the pages
created in each section will now be combined to form the site's index.
To unite these pages and avoid
problems with the included files, you will use another
product: .
To create the index page, follow the next steps:
- Open the index page in
.
- Add a table containing 1 row and 2 columns. Set the
cell spacing to 5, in order to separate the cells easier.

- In the first cell of the table, you will display
the menu. Since the menu has been created as a separate page, you can
use it with the help of an server behavior,
namely the . It acts
similar to the standard Server-Side Include (accessed from the
menu: Insert -> Script Objects -> Server-Side Include), but without
the inherent problems that are caused by repeating the <head>
tags.
Place the cursor in the table's first cell, and then apply this server
behavior.
- To access it, click the button in the
tab, and then select .
- In the text field of the user interface, select the
front/menu.php file, either by entering its
path, or by using the button to select
it from the local folders.
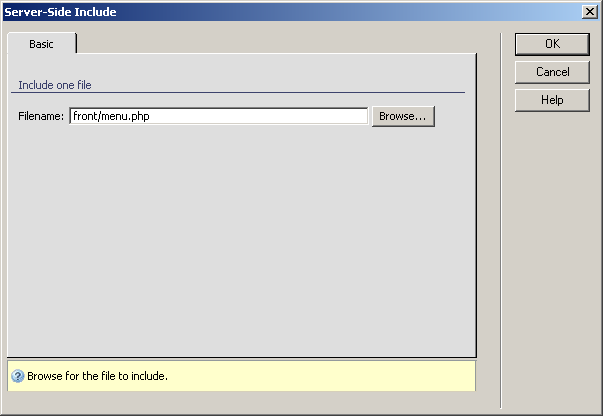
- When you click the
button, the server behavior will be added to the page, and the menu
file's content will be displayed:

- In the second table cell, the page content is to
be displayed. But this content varies, depending on what is selected:
· A welcome
page, when the index is viewed for the first time. This will be created
at the end of this section, as it will contain only some welcome text.
· An article
list page, front/view_list, when a link in the
menu is clicked
· The actual
article, when the read more link is pressed.
- To solve this problem, offers another server behavior: the . What this does is allow you to define an URL
parameter and what pages to load, depending on the values it receives.
The URL parameter used with this server behavior is by default named
. You can use any URL parameter name
you wish. The only rule is that it has to be consistent throughout the
pages (e.g. the same URL parameter name must be used in the Server Side
Includes definition, as well as in the menu that passes the links).
The three cases mentioned earlier, translate into the following combinations
that can be used with the dynamic includes server behavior:
· for the
welcome page: value: none, file to include:
front/welcome.htm
· for the
article listing page: value: 1, file
to include: front/view_list.php
· for the
article page: value: 0, file to include:
front/view_art.php
- Now open the server behavior from , and fill
in the fields with the values listed below:
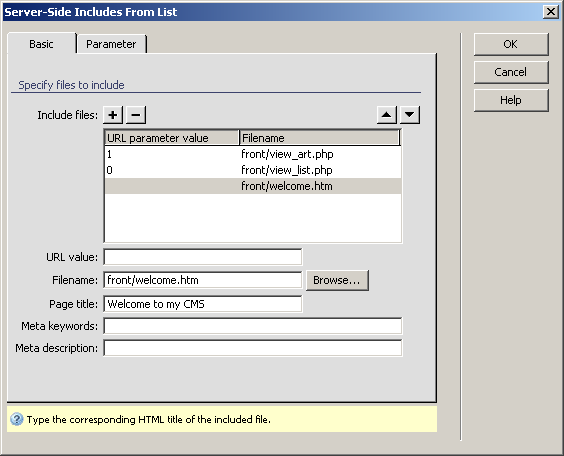
Don't forget to specify your parameter name in the Parameter
tab. The same parameter name must be passed by the links in the menu,
in order to display the correct pages.
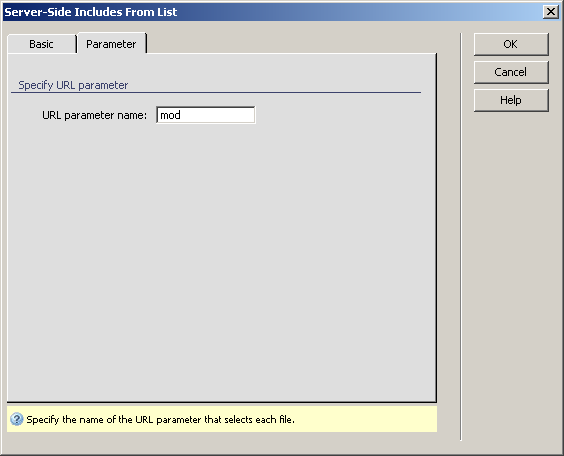
- Adjust the links in the menu
and view_list files: make them point
to the index page and make sure they pass, besides
the existing id_pag URL parameter, a new one, ,
with the values set to 0, respectively 1. The mod parameter is used by
the Server-Side Includes from List server behavior to identify the pages
to load.
Let's not forget the welcome.htm file. Create
this file in the front folder, and type in (with
heading 1 formatting) Welcome to my CMS. This should do it.
Once
you've altered the links, and created the welcome page, you can test-drive
the site's main page. Save it, and preview it in the browser. Since this
is a public page, you didn't apply the server behavior, and as such you do not need to
login to view it:

If you select an item from the menu, and then an article from the list,
it will load the view_art page displaying the
selected article:
