An AFTER trigger is a specific type of trigger which is executed after
a database transaction.
Common uses of AFTER triggers are to propagate values to fields other
than those involved directly in the transaction, or to accomplish tasks
such as sending a confirmation e-mail message.
A transaction is a group of SQL statements whose effects are logically
connected. Anything from simple queries to inserting, and deleting operations
can be considered a transaction, as well as more complex groups of several
statements which accomplish a specific task.
The InterAKT Dynamic Data tool is a replacement for the standard dynamic
data dialog. It is used in the MX Kollection 3, to provide a unified way
of building mark-ups, or place holders. These are recordset fields, server
or session variables, and other types of dynamic data that are replaced
at runtime by their corresponding values
A database refers to data organized and stored on a computer that can
be searched and retrieved by a computer program. Most industrial-strength
and many smaller database applications can be addressed using SQL (Structured
Query
Language).
A query is a SQL command that will extract information from the tables
of a database. Essentially, a query is a request for information from
your database.
Send E-mail
This trigger allows the site
developer to automatically send an e-mail when a form is submitted. It
is an AFTER trigger,
and it can be executed after insert/update/delete/custom transactions.
This trigger is accessible from the Application
panel, Server Behaviors -> + -> MX Kollection
-> Send E-mail -> Send E-mail.
The user interface is divided into three (or four) tabs, depending on
the MX Kollection version that you have installed:
The Main tab - set the
basic e-mail options here: sender, receiver, message and subject.
The Options tab - set
more advanced e-mail options, like format, carbon copies and importance.
The Attachments tab
- available only in MX Kollection 3 Professional, allows defining rules
for attaching files to a message.
You can learn how to configure each of the interface tab in the sections
below.
The Basic tab
Allows defining the basic e-mail options.
To set the dialog box options for the first tab, follow the next steps:
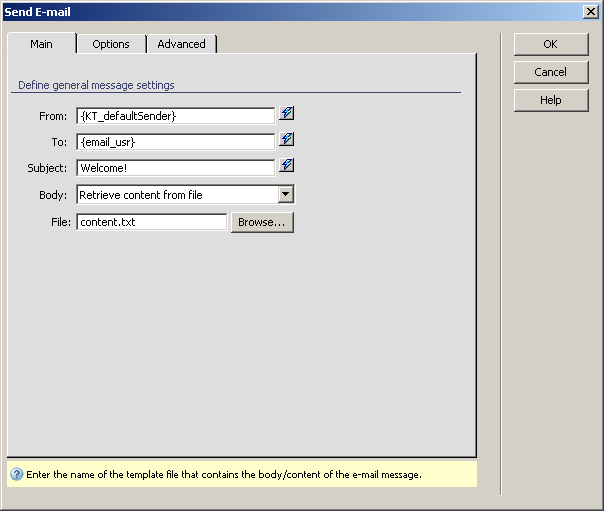
In the From text box
enter the sender's e-mail address (the administrator's address). The default
option is the one set in your e-mail
settings. If you haven't edited it in the InterAKT
Control Panel, then your sender's address is nobody@nobody.com.
You can use the InterAKT
Dynamic Data feature to input dynamic data
in the corresponding field. You can also type your message template directly,
using the InterAKT mark-up language.
Text between braces (such as {text}) that will not be recognized as valid
mark-up language, will remain as such, without being replaced by anything
and without breaking the application code.
Note: If you used a certain sender in your From
field and later on apply the same server behavior, wanting to go back
to the default sender, type in the From text
box: {KT_defaultSender} (you will notice that
your previous choice will be displayed there due to the user interface
persistence). Learn more about the InterAKT
mark-up language by reading the description given here.
In the To text box enter
the e-mail address to which you want the message to be sent. You can also
input dynamic data in that text box.
In the Subject text
box type the title/subject that you want the e-mail message to have. The
InterAKT Dynamic Data is available here
too.
In
the Body drop-down menu select one of the
two available options: Write content or Retrieve content from file. Depending on your choice,
the last field of the interface will differ:
In your configuration, if the Body
field is Write content, follow the next instructions:
· In the
Content text area type the actual body of
the message you want to send. The InterAKT Dynamic
Data feature is available for this field. Use it to add data from
database
fields to the message body.
· The Insert all fields button offers the possibility
of inserting all the database columns in the message content with a single
mouse click. You can do this also by using the InterAKT
Dynamic Data, but you would have to click on each of the columns
in order to add them to the message. Precious seconds of your time are
saved by using this button when you need to insert all or most of the
columns in the message content.
In your configuration, if the Body
field is Retrieve content from file, follow
the next instructions:
· In the
File text box enter the name of the file
that you want to send as the e-mail body. You can also use the Browse
button to select the file (a template file) that contains the actual message
content. If the file is located outside the site root folder, it should
be copied to the site folder and uploaded to the remote server, in order
to be retrieved by the web application. Dreamweaver
prompts you to do this. The file is not sent as an attachment, but constitutes
the actual e-mail message body.
The accepted file types are .txt
for Text Only messages and .htm,
and .html for HTML Text
messages.
Note: Any <script> tag will
be removed from both Text Only and HTML Text messages. Database field names can be
used in the message body by inserting them between braces. In the actual
e-mail message, they will be replaced by the corresponding contents from
the database. For instance, "Dear {firstname}"
will be replaced by "Dear John".
The three buttons in the top right corner of the
interface offer you the next functionalities:
· Click OK when you are done configuring the trigger.
· Click Cancel to exit without applying the new settings.
· The Help button opens this help page.
These buttons are common to all three tabs of the Send
E-mailtrigger
interface.
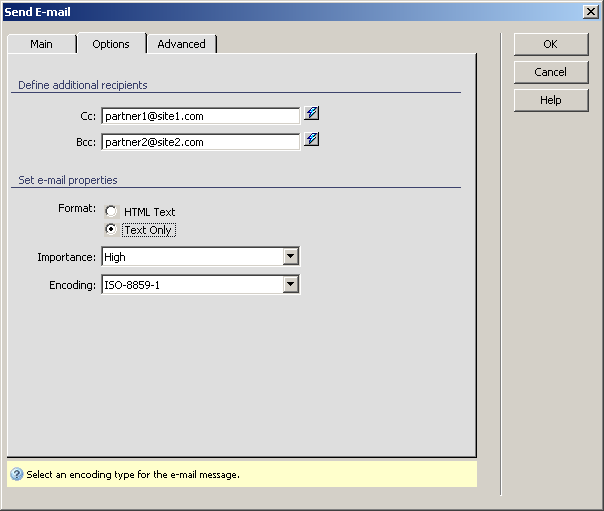
Click on the Options
tab to continue with configuring the trigger.
The Options tab
Define the e-mail format, carbon and blind carbon copies and importance.
To set the dialog box options for the second tab, follow the next steps:
In the Cc text box enter
the e-mail addresses to which you want carbon copies of the respective
message to be sent (the list of e-mail addresses will be seen by all those
who receive the message);
In the Bcc text box
enter the e-mail addresses to which you want blind carbon copies of the
respective message to be sent (the list of e-mail addresses will be invisible
to each of those who receive the message).
Note: In the To, Cc,
and Bcc fields you can also enter multiple
e-mail addresses, separated by commas.
The
Format radio buttons offer two types of e-mail
messages from where you can choose: HTML Text
and Text only. The first option is the default
one. Text only messages are stripped of all formatting and HTML tags.
In the Importance drop-down
menu select one of the three available options that indicate the message
priority: Low, Normal,
High. By default, the Normal
option is selected. Recipients who use an e-mail client (such as Outlook
Express) are able to sort messages by priority.
In the Encoding drop-down
menu select one of the three encoding types: ISO-8859-1,
UTF-8, and None. By
default, the ISO-8859-1 option is selected.
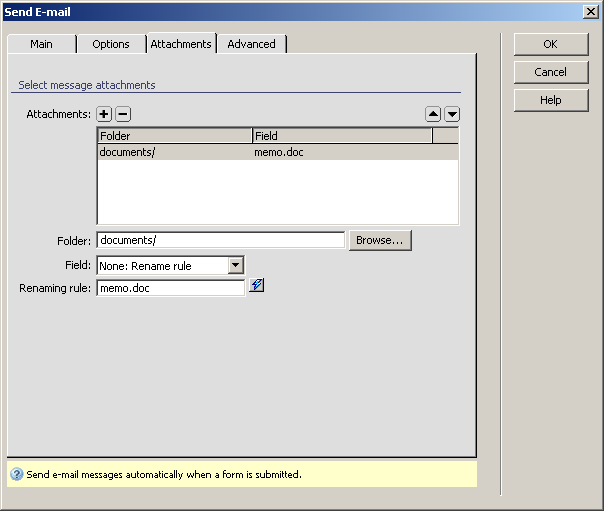
The Attachments tab
This tab of the user interface is only available in the MX
Kollection 3 Professional version and allows the user to select
files that will be sent with the e-mail message as attachments.
Configure the user interface options as shown below:
The Attachments grid
displays all of the attachment rules defined for the current server behavior.
You can add and remove attachments by using the Plus
(+) and Minus (-) buttons on top
of the grid. Fill in each rule's options by selecting it in the grid and
filling in the fields below.
In the Folder field
enter the relative path to the folder storing the file(s) you wish to
send. You can use the Browse button to select
the folder from the site structure. The path to the folder will be displayed
relative to the current document.
In the Field drop-down
menu select which of the transaction field stores the file name. If not
using a recordset, or using a custom naming, select the None:
Rename rule option.
In the Renaming rule
text field enter the name of the file to attach. This field is enabled
only when using the Rename rule option,
and allows you to enter static and dynamic data which will compose the
name of the file. You can either enter InterAKT
Mark-up directly or use the InterAKT
Dynamic Data icon to visually select it.
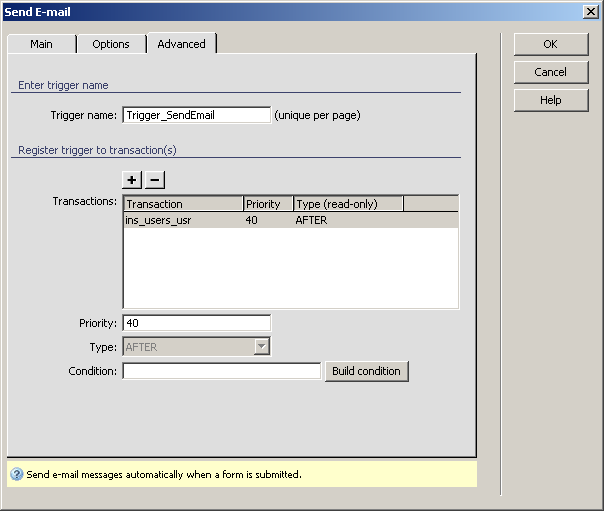
The Advanced tab
On the last and optional tab of the user interface, configure the trigger
properties: transaction to attach to, priority and when to execute it.