The process of protecting a web site by requiring a user to enter an
authorized ID and password before entering the site
A transaction is a group of SQL statements whose effects are logically
connected. Anything from simple queries to inserting, and deleting operations
can be considered a transaction, as well as more complex groups of several
statements which accomplish a specific task.
A database refers to data organized and stored on a computer that can
be searched and retrieved by a computer program. Most industrial-strength
and many smaller database applications can be addressed using SQL (Structured
Query
Language).
A query is a SQL command that will extract information from the tables
of a database. Essentially, a query is a request for information from
your database.
A trigger is a SQL procedure that performs an action when a transaction
(INSERT, UPDATE, DELETE) occurs. You can use triggers to perform validation
of input data, to automatically generate a value for a newly inserted
row, to read from other tables for cross-referencing purposes, or to support
alerts through e-mail messages.
Build user
registration
When you decide to implement a user authentication
system for your site, the first step to take is to create a way for users
to create accounts. This is the user registration process, which usually
contains an insert transaction
(to add the user data into a table) together with some checks to make
sure the user name is not taken, and that the confirmed password matches
the entered passwords. MX User Login gives
you the possibility of doing all of these actions in a single place, with
the User Registration Wizard.
The User Registration Wizard is accessible
from two locations:
The MX Kollection tab
of the Insert bar.
The Application panel,
Server Behaviors -> + -> MX Kollection ->
User Login -> User Registration Wizard.
In order to be able to use the wizard, you must have MX
Send E-mail installed, either as a separate product, or as part
of the MX Kollection 3 bundle. Also, if
you have MX Form Validation, a third step
of the wizard will be available, allowing you to validate the form elements.
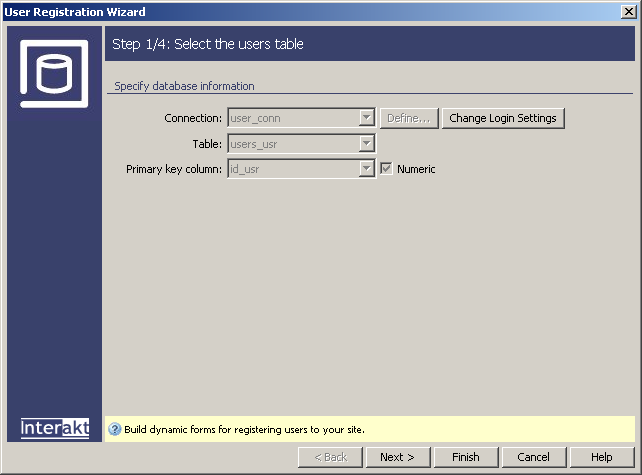
To set the dialog box options for the first step
of the wizard, follow the instructions below:
The Connection, Table and Primary key column
interface fields display the settings established in the login
settings of the Control Panel. All login
options are set globally.
If you want to change any of these settings, click
the Change Login Settings button and the
control panel entry mentioned above will be displayed.
The five buttons in the lower part of the interface
offer the following functionalities:
· With the
< Back / Next
> buttons you can navigate through the wizard's steps.
· Click Finish when you are done configuring the wizard.
· Click Cancel to exit without the new settings to be
applied.
· The Help button brings you to this help page.
These buttons appear in all the User Registration
Wizard steps.
Click Next to continue
with configuring the wizard.
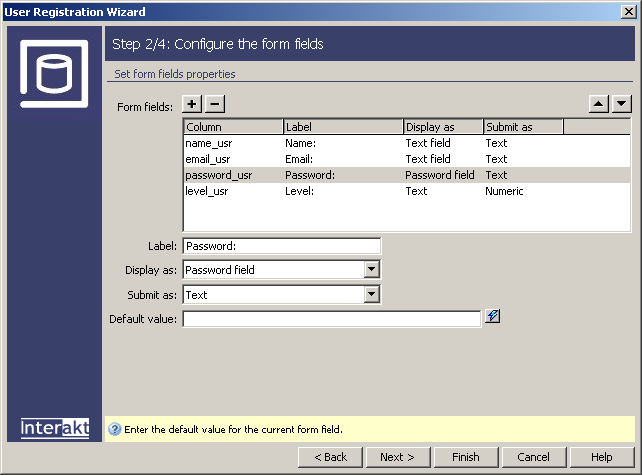
In the second step of the wizard, you will associate for each table
column the form element to be displayed. To set the dialog box options,
follow the instructions below:
In the Form fields grid,
all table columns that are used in the transaction are displayed, with
their associated properties: label, form element, submit type, and default
value (where needed). You can add or remove columns to/from the transaction,
with the + and - buttons placed on top of the grid, and you can change
fields order with the up and down arrows above the grid.
Specify how each
item should be displayed in the HTML form
by selecting a row (single click) in the Form fields
area and entering information in the boxes below the grid as indicated
below.
In the Label text-box
enter the text to be displayed next to the form element.
In the Display as drop-down
menu select the form element to use for the table column. For the password
field, you must select Password field, in order for the confirm password
automatic generation and check. To read the detailed description for each
of the available options, click here.
In the Submit as drop-down
menu, select the data type to use when submitting information to the database.
In the Default value
text-box enter a value that will be displayed by default in the form element,
when the page loads.
Click Next to continue
with configuring the wizard.
Note: If you remove the password field from
the grid, by clicking on the Minus (-) button, a password will be automatically
generated by MX Kollection, and will be sent by e-mail to the user (if
the Send welcome e-mail option is checked). If no e-mail message is to
be sent to the user, the account is blocked (there is no way to discover
the password).
Note: If you have MX
Kollection Professional and have defined in your database columns
for storing the maximum number of login attempts, the account disable
date, registration date and expiration date you should leave those columns
out of the registration form. They receive the right values behind the
scenes, in a transparent manner: the registration date field gets the
current date, the expiration gets the current date plus the expiration
period defined in the control panel. If for any reason you want to have
some of the fields initialised with your custom value, make sure you set
it to be displayed as Text and remove it from the page form so that the
users cannot alter it.
In
the third step, if you have MX Form Validation,
you can set validation rules for the form elements. For instructions on
completing this step, see Form
Validation in wizards.
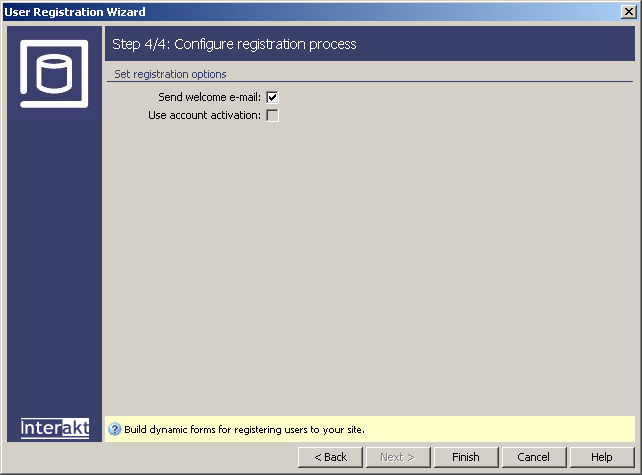
In
the fourth and last step of the wizard, you can set some registration
options. To set the dialog box options, follow the instructions below:
If you want to send welcome e-mail messages and if
you want to use account activation, check the corresponding checkboxes.
Note: The Use account activation
checkbox is disabled if in the login
settings of the Control Panel there
is no table column specified that stores the account active state.
Click Finish when you
are done configuring the wizard.
When you finish with the wizard configuration, it will add the HTML
form, a Send E-mail trigger
and a Throw error trigger. When you open the page in the browser, and
try to register, the wizard will perform several actions:
Check if the user name is unique.
Compare the password field versus the confirm password
field (if any).
If everything went fine, insert the data into the
table.
As last action, send a welcome e-mail.
Note: If you use this server behavior
on the ColdFusion server model, a file named
Application.cfm will be automatically generated
in the site root folder. Do not delete this file, as it contains settings
related to session variables used by the server behavior and the current
application. If you remove this file or modify it, application pages that
use sessions will not function properly.