![]()
![]()
In a previous topic you have blocked the add, edit and delete actions according to some conditions (user level, the article assigned user ID etc.). This hides the buttons from the list, but if the form page is accessed directly and the URL is altered, the actions will still execute. To prevent this you will have to add some conditions to each possible operation.
The NeXTensio form allows executing three different operations on the same page - insert, update and delete. Also, the condition to be met for each operation is different, so you cannot block the entire page from loading just to prevent a single operation. To block a specific operation from the form, you can use a Throw Error trigger. A trigger is an action that gets executed before or after the main operation. The Throw Error trigger executes before the operation and can stop it if set so.
To prevent unauthorized users from adding new articles follow the next steps:
Open the admin/form page in Dreamweaver.
Go to the Server Behaviors tab > Plus (+) > MX Kollection > Forms and select the Throw Error entry.
On the first tab of the user interface that loads
- Basic - define what error message to display:
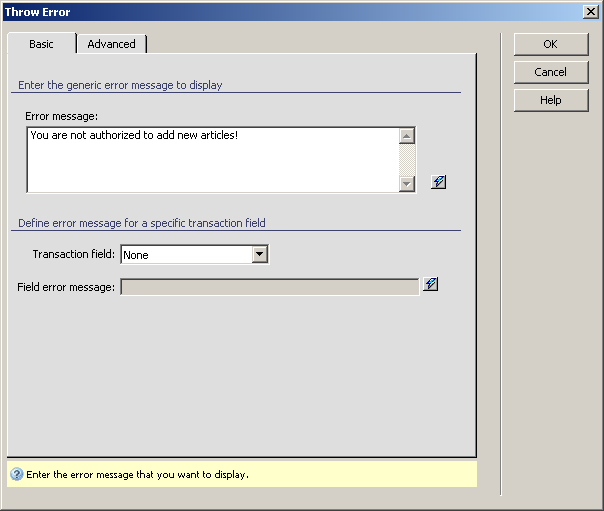
In the Error message textarea enter: You are not authorized to add new articles!
In the Transaction field select None. If you select one particular field, you can also define an error message to be displayed next to it.
Next click the Advanced
tab to decide to what action the check will be applied, and to set the
condition:
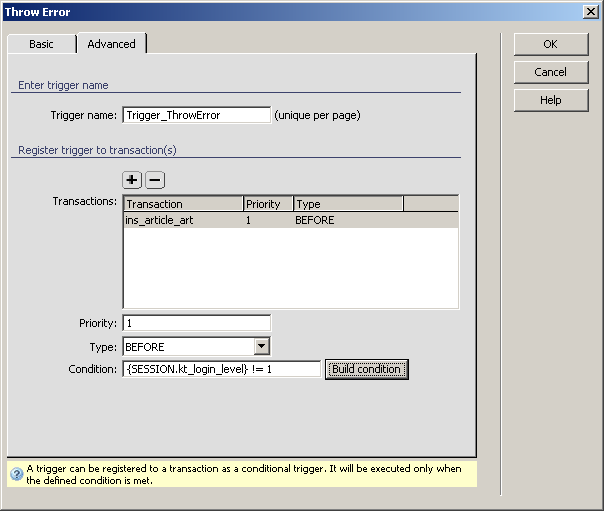
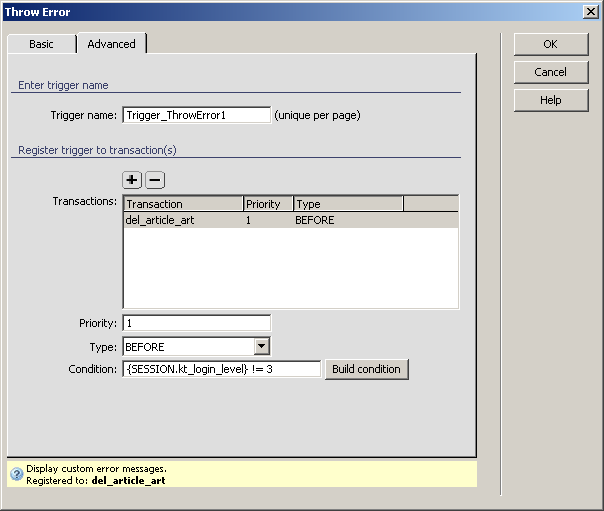
From the Transactions list remove all items except for the ins_article_art. To remove a transaction from the list, select it and click the Minus (-) button.
In the Priority text box enter 1. This is the order of execution: for lower values, it gets executed earlier.
In the Type drop-down menu select Before.
Click the Build condition
button to visually construct the executing condition: the logged in user's
level equals 1:
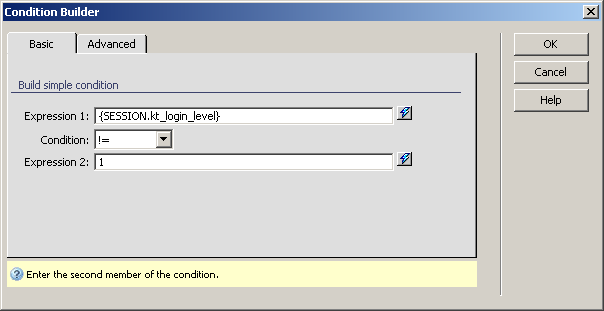
In the Expression 1 text box enter {SESSION.kt_login_level}. This is a dynamic mark-up that is replaced at run-time with the session-saved access level.
For the Condition select the different operator in the drop-down menu.
In the Expression 2 text box enter the desired user level: 1.
Click OK to define the condition when done.
Back in the Throw Error user interface, the condition code has been added to the text box.
Click OK to close the user interface and apply the changes.
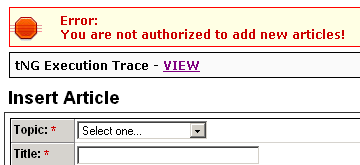
Save the page. If you login with an editor account and enter the form
URL in the browser's address bar to add a new article, the error message
defined earlier will be displayed. The form still appears, but the insert
will not work:
Note: The error message displayed differs when in Development or Production mode. For more information about the error reporting modes, see this page.
Next you have to block the delete operation for all users except for the webmaster. To do so you will use the same approach as above, with some differences:
Editing an article is allowed in two situations, as explained in a previous topic, which can be reduced to one condition: the user ID set in the assigned_to_art column must match the currently logged in user ID. The update operation on the form must be allowed only if the two match. To create this condition you must first create a filtered recordset that retrieves the ID of the user, and then apply a Throw Error server behavior configured on the correct condition.
To stop unauthorized users from editing articles follow the next steps:
Open the admin/form page in Dreamweaver.
Go to the Bindings tab > Plus (+) > Recordset (Query).
Configure the Recordset
interface as shown below:
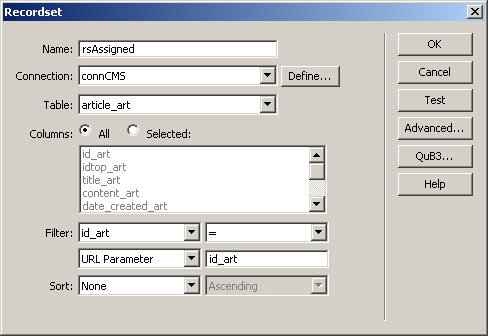
In the Name text box enter the new recordset's name - rsAssigned.
In the Connection drop-down select the Dreamweaver database connection created earlier - connCMS.
In the Table drop-down menu select the article_art table.
In the Filter drop-down menu select the column to match - id_art. It must equal the id_art URL parameter that is passed to the NeXTensio form on update.
Click OK to create the recordset.
Go to the Server Behaviors tab > Plus (+) > MX Kollection > Forms and select the Throw Error entry.
In the first tab of the user interface that loads - Basic - define what error message to display.
In the Error message textarea enter: You are not authorized to edit this article!
In the Advanced tab, from the Transaction list remove all entries except for the upd_article_art transaction. In the Priority text field enter 1.
Click the Build condition button to set the execution condition. Configure the Basic tab as shown for the article list restrictions
In the window that opens, for the Expression
1 text box click the InterAKT Dynamic Data
icon to select a recordset field:
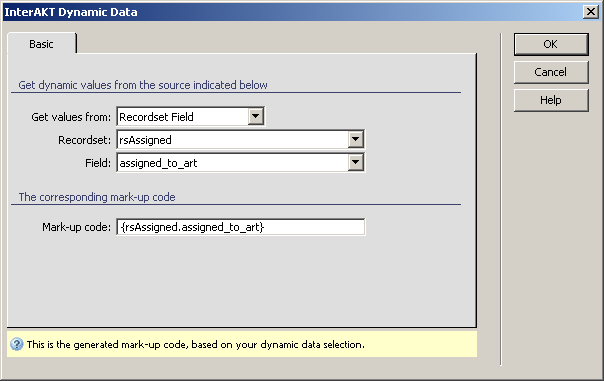
In the new window that loads, in the Get values from drop-down menu select Recordset Field.
In the Recordset drop-down menu select rsAssigned.
In the Field drop-down menu select assigned_to_art.
Click OK to close this window.
In the Condition drop-down menu select the different operator (!=, <> or NEQ).
In the Expression 2 text box enter {SESSION.kt_login_level} to retrieve the currently logged in user's level.
Click OK twice to apply the server behavior.
Now the restrictions are completely created, and only the correct users can add, edit or delete articles.
This concludes the Content Management System (CMS) tutorial that uses MX Kollection 3 and KTML 4 to allow your users create their own rich content. You can further improve this application by:
Creating a set of NeXTensio list and form for the topic management.
Create a user registration form.
Notify users by e-mail when a new article has been approved, and the editor when a new article has been assigned to him/her.
If you want to find out more things you can do with MX Kollection 3, check out the online tutorials here.
For help on editing content with KTML 4, read this tutorial.