Post job opening
In this section of the tutorial, you will build the page that will allow
companies post a new job opening on the site. It is basically an insert
operation, but one that will be improved with the help of better form
controls - .
To create the new job posting page, follow the next steps:
- Open the company/post_job
page in .
- The job posting is actually an insert operation in
the job_job table, which stores various details regarding the offer, some
columns as direct text / numeric values, and some are just foreign keys
to other tables - some of them editable, and some not (e.g. the company
ID is not editable, while the job location or domain is) - that need to
be retrieved.
- The only non-editable foreign key - the company ID
- must be passed to the table column behind the scenes, without displaying
anything to the user. To achieve this, you must retrieve it before creating
the insert form, from the company_com table.
- The way to retrieve the company ID is to use a filtered
recordset, based on the company's associated user ID. This is stored as
foreign key in the company_com table, but exists also as a session variable
(the company must be logged in before posting an offer). Create a new
recordset from the Bindings tab, that uses the company_com table, and
filters the records based on the
session variable, as shown below:

- Now you can start creating the actual offer posting
form, with the use of the .
You can access this wizard from the
tab of the Panel.
- For the first step, configure it to use your specific
database connection (the one defined at the beginning of this tutorial)
and table (e.g. the job_job table). For the
page to open after the insert operation is successful, use the Browse
button to select the company/index file:

- Once you're done with the general options for the
wizard, you can move on to the second step, where you will have to set
the properties for each field. To modify the settings for a field, select
it from the grid, and then use
the Display as and Submit
as drop-down menus to set the respective properties. Depending
on the selected option, some
additional elements can become visible on page (e.g. for menu, the and button).
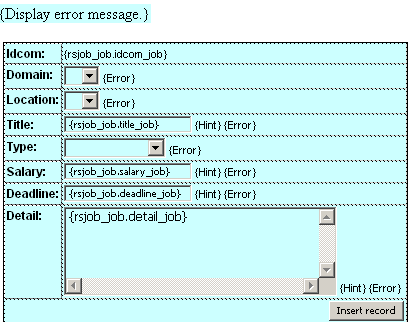
- For the job's table columns, set the following properties:
- The idcom_job field should not be editable by
the user in the form. To ensure the security of the data as well, set
it to be displayed as text. This will add the row in the HTML form with
the label and the actual value, but you will delete it later. Its value
will be retrieved from the recordset created at step 4 of this section,
by using the Default Value property. To select a dynamic value to use,
click on the InterAKT Dynamic Data icon, and configure the dialog box
that opens to retrieve data from the rsCompany recordset, the id_com field:
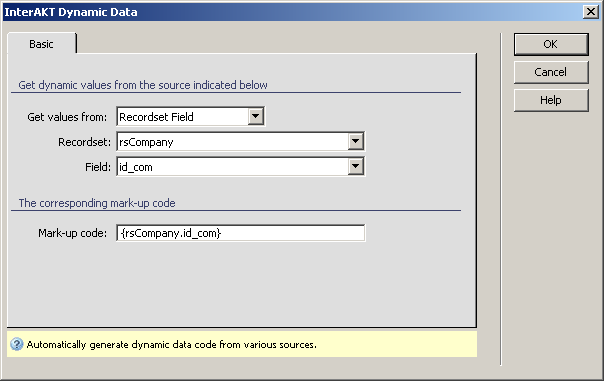
- Click on OK to add the mark-up code into the
Default value text field. It will be replaced at runtime with the correct
dynamic value.
- The next field is also a foreign key, iddom_job.
It stores the code for the job's activity domain. To allow the user select
the desired domain from an existing list, you must use a drop-down menu
as form element. Select the option
in the Display as drop-down menu. Two more
buttons become available:
and . Since the menu will
be populated by dynamic values, you must first create a recordset.
- Click on the Add recordset button to add a new
recordset that retrieves all data from the domain_dom table.
- Next click on the Menu properties button to define
what table columns to use for the menu's elements. Select the source recordset,
the label and values columns:

- The same steps as above must be followed for
the idloc_job field. Set it as menu, and use a recordset based on the
location_loc table. Configure the menu to use the correct columns for
labels and values:

- The next field to configure is type_job that stores
the job type. There are only three possible job types, and to avoid bad
input, the user should be allowed to select one from a menu. Since the
menu does not use dynamic values this time, you can skip the recordset
adding step, and go right to configure the menu.
- In the Menu properties dialog box, add three
static options, with the same value for both labels and names (it is stored
as plain-text in the table, and not a foreign key):

- Close the dialog box by clicking on the button. The new field type is reflected in
the grid.
- The last thing you can change in the wizard,
is the detail_job field. As it will contain
a brief description of the job, it will use more characters, that will
be displayed poorly in a text-box. Change its display as type to a text
area. Also, change the labels for the domain and location foreign keys
- Domain and Location.
- Click the button
to add the HTML form and the insert record server
behavior
into the page.
Note: If you are using a
database, in the Submit as drop-down menu,
for the deadline_job field, another option will be available: Date
MS Access. Select this option when submitting the date.

In Dreamweaver you have to remove the user ID row from the form, as
it must not show up on page:
At this point, the job offer posting page works as intended, but can
be greatly improved - the deadline can be selected visually from a calendar,
the domain list could be increased, by allowing a company define its domain,
or restrict the number for salary to positive integers - with the help
of more advanced form controls.
The way to enhance these standard HTML form elements, is to replace
them with form controls:
an editable drop-down menu for the domain;
a date-picker calendar for the deadline;
a numeric control for the salary;
a restricted number of characters for the text-area.
The first element to be enhanced is the Job domain
drop-down menu. The reason is that the site's administrator cannot add
all job domains; therefore, if a company wants to post a job add in a
domain that doesn't exist in the database, it should be able to do it.
The form control that allows this kind of behavior is the .
To enhance this field, follow the instructions below:
- Select the Job domain drop-down menu in the editable area.
- Apply the
server behavior. You can access it from
- Configure the dialog box that opens. The recordset
name, labels and values field are already set, because the menu was already
dynamic, from the wizard. You just need to set some more advanced options:
· The number
of records to be displayed when the menu is opened. The menu contains
all records from the recordset, but only a limited number is displayed,
for performance reasons.
· The Single click select checkbox allows the user to
click only once to select an item.
· In the
Restrict to list elements drop-down menu,
select , as this will allow the addition
of new elements. Leave the rest of the options at their default values,
and click on to apply the server behavior:

Note: If you use this server behavior on the ColdFusion server
model, a file named Application.cfm will be
automatically generated in the site root folder. Do not delete this file,
as it contains settings related to session variables used by the server
behavior and the current application. If you remove this file or modify
it, application pages that use sessions will not function properly.
Next comes the deadline field. To ease the way
users enter the dates, and to make sure they do not enter anything wrong,
this simple text-field will be replaced by the control. Follow the instructions below to enhance this HTML
form element:
- Select the deadline text-box in Dreamweaver's editable
area.
- Apply the
server behavior. You can access it from the
- The default options are enough for this page, so
you can just click the button to replace
the text-box. In addition to the date picker interface, the date format
can also be changed from the ,
under Date formats.
The next field to change to a widget is the salary one. In order to
prevent bad input (e.g. characters, negative values, etc) you should apply
the Numeric Textfield Widget on this field. You
can access it from the and you do not need to configure anything: the default settings
are good:

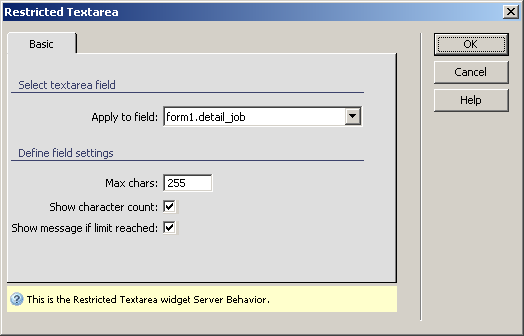
The last form field to enhance is the job details text area. You will
replace it with the
control. Simply select the text area in Dreamweaver's editable area, and
apply the server behavior
from . Set a maximum number of characters, and check the
Show character count checkbox:
Now you can save the page in the browser and upload it to the server.
To check it out, first log in with a company account, and then point your
browser to the section. Fill in
the form, using the enhanced controls, and upon submitting, all users
will be able to see it:

In the next section of
the tutorial you will create a page that allows companies see who applied
for a position.
