![]()
|
|
![]()
|
|
The Check Master Record server behavior allows the developer add a check to ensure that the master record used by the page exists in the table.
To add a Check Master Record trigger into the page, you must follow the next steps:
The user interface that opens is divided into
two tabs. Configure these tabs as follows:
· The
Basic tab, where options related to the actual check can be set.
· The
Advanced tab, where trigger specific options can be set.
The purpose of this user interface tab is to allow the developer set
up the fields to be checked in the master table:
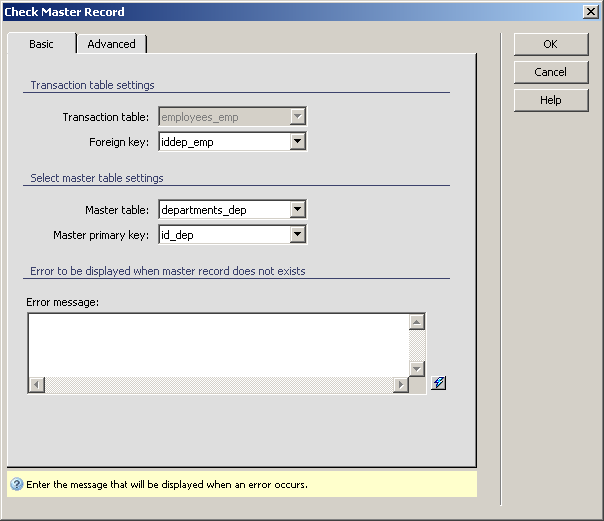
To set the dialog box options, follow the next steps:
In the Transaction table drop-down menu, the table used in the insert/update/custom/login transaction on page is automatically selected and the drop-down menu is disabled.
In the Foreign key drop-down menu select the table column containing the link to the master table.
In the Master table drop-down menu select the table which acts as a master table for the transaction one. The drop-down menu is populated based on the connection used in the page.
In the Master primary key drop-down menu select the master table column that stores the primary key.
In the Error message text area enter the text to be displayed when the check fails, meaning that the master record does not exist. You can use the InterAKT Dynamic Data (the lighting bolt icon) to build the message.
The three buttons in the top right corner of the
interface offer you the next functionalities:
· Click OK when you are done configuring the trigger.
· Click Cancel to exit without applying the new settings.
· The Help button opens this help page.
These buttons are common to both tabs of the Check
Master Record
The purpose of this user interface tab is to allow the developer to
change the default trigger properties, to suit the particular situation.
All trigger properties (name, type, priority, transactions) can be set
from this dialog box:
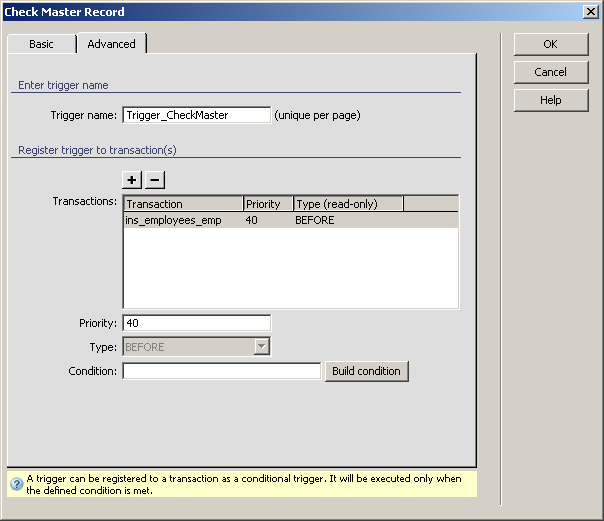
For instructions on completing this step, see the Advanced tab. For the Check Master Record trigger, by default the Priority is set to 40 and the Type is BEFORE (because checking if the master record exists must be done before the transaction).
The server behavior added this way can be edited later by double-clicking
its name in the Server Behaviors tab of
the Application panel.