A server behavior is a reusable component for server-side development.
They add blocks of code to your pages for accomplishing specific tasks.
Dreamweaver comes with several default server behaviors and the InterAKT
extensions add many more to this list.
A transaction is a group of SQL statements whose effects are logically
connected. Anything from simple queries to inserting, and deleting operations
can be considered a transaction, as well as more complex groups of several
statements which accomplish a specific task.
A trigger is a SQL procedure that performs an action when a transaction
(INSERT, UPDATE, DELETE) occurs. You can use triggers to perform validation
of input data, to automatically generate a value for a newly inserted
row, to read from other tables for cross-referencing purposes, or to support
alerts through e-mail messages.
A time value, expressed in milliseconds, typically since the last server
reset. Timestamp values wrap around (after about 49.7 days). The server,
given its current time is represented by timestamp T, always interprets
timestamps from clients by treating half of the timestamp space as being
earlier in time than T, and half of the timestamp space as being later
in time than T. One timestamp value, represented by the constant CurrentTime
is never generated by the server. This value is reserved for use in requests
to represent the current server time.
Validate Form server behavior
This server behavior
allows adding validation rules to transaction
form fields, in order to ensure that only correct data is entered.
To add a Validate Formtrigger
into the page, you must follow the next steps:
First create an Insert,
Update, Custom
or Login transaction. The server behavior
is implemented as a trigger, therefore a transaction must exist on the
page, so that the trigger can register to it. If more than one transaction
exists, the trigger will register to all of them.
Access the server behavior from the Application
panel, Server Behaviors -> + -> MX Kollection
-> Form Validation -> Validate Form.
The user interface that opens is divided into two
tabs. Configure these tabs as follows:
· The
Basic tab, where options related to the actual validation must be
set.
· The
Advanced tab, where trigger specific options can be set.
Once you're done setting the options, click OK to apply the server behavior.
The Basic tab
The purpose of this user interface tab is to allow the developer set
up the validation rules for each transaction field:
To set the dialog box options, follow the next steps:
The Form fields area
displays all the transaction fields to which validation rules can be applied.
The fields list is retrieved from the registered transactions. If registered
to multiple transactions, the area will contain the reunion of the transaction
fields.
The area displays the field name, how it is submitted, the required
state and the associated validation format. After selecting a field from
the grid, you can set its options, using the elements below.
The Required checkbox
determines whether the selected field is mandatory or not. If checked,
it will display a red * in the form, next to the field name.
In
the Validation format drop-down menu select
the validation rule to apply on input data. The following options are
available:
If the field is submitted as text
(you can see this in the second column of the Form
fields grid), one of the following validation formats can be applied:
· No Validation
– if you do not want to enforce any data validation on the form field.
· E-mail
Address – checks if entered text is an e-mail address (such as user@domain.com).
· Credit
Card – checks if entered text is a credit card number.
· Credit
Card Visa – checks if entered text is a 13 or 16-digit credit card number
· Credit
Card Mastercard
– checks if entered text is a 16-digit credit card number
· Credit
Card American Express – checks if entered text is a 15-digit card number.
· Credit
Card Discover – checks if entered text is a 16-digit card number.
· Credit
Card Diners Club – checks if entered text is a 14-digit card number.
· ZIP Code
– checks if entered text is a numeric postal code (several formats are
accepted).
· ZIP Code
US (5 digits) – checks if entered text is a 5-digit postal code (having
the mask NNNNN).
· ZIP Code US
(9 digits) – checks if entered text is a 9-digit postal code (having the
mask NNNN-NNNNN).
· ZIP Code
Canada – checks if the entered text conforms to the mask ANA NAN.
· ZIP Code
UK – checks if the entered text conforms to one of the masks AN NAA,
ANA NAA, ANN
NAA, AANNAA, AANANAA, AANNNAA.
· Phone Number
- allows - / . () + , and space as digit
separators.
· Social
Security Number
· URL
· IP Address
· Color (hexadecimal)
· Color (plain-language)
· Mask
· Regular
Expression - allows you to define your own validation rule in the displayed
text box. For more information on regular expressions, please visit http://www.regular-expressions.info/
Note 1: In the examples above, A
represents a letter and N represents
a digit.
Note 2: The Mask validation
format provides an easy way to define your own rule for acceptable field
input. The rule you write determines what type of input is allowed in
each character position and the length of the entry. The following characters
have special meanings:
· A
- Allows an upper or lower-case character: A-Z and a-z.
· X
- Allows an upper or lower-case character or number: A-Z, a-z, and 0-9.
· 9
- Allows a number: 0-9.
· ?
- Allows any character.
· If you
enter any other character (other than the above) it will be inserted into
the field data.
Let's consider the following example for a Mask
format: AAA?AAAA?AAAAA. The "Try this today" input is allowed,
while the "Try this tomorrow" or "Try it 5 times"
inputs are not allowed (the first one is too long, the second one contains
characters not accepted by the mask).
Except for the Mask and Regular Expression formats, you can notice
two text boxes in the interface, under the Validation
format drop-down: Min char and Max char. Enter the minimum, respectively the maximum
number of characters allowed for that form field.
If the field is submitted as numeric,
the following options are available:
· No Validation
· Numeric
· Positive
Integer
· ZIP Code
· Mask
· Regular
Expression
Except for the Mask and Regular Expression formats, you can notice
two text boxes in the interface, under the Validation
format drop-down: Greater than and
Less than. Enter the minimum, respectively
the maximum value accepted by the form field.
If the field is submitted as date
or as timestamp,
the validation formats that can be applied are:
· No Validation
· Date
· Datetime
· Time
· Mask
· Regular
Expression
Except for the Mask and Regular Expression formats, you can notice
two text boxes in the interface, under the Validation
format drop-down: Greater than and
Less than. Enter the minimum, respectively
the maximum date/time accepted by the form field. You can also notice
a button labeled Change. By clicking it,
you can change the date formats.
In the following text boxes you can choose a minimal
and maximal value, depending on the validation type and format selected
earlier.
If the Custom message
option is checked, you can define your own error message to be displayed
when the data does not match the validation format.
In the Error message
text box (enabled when the option above is checked) enter the custom message
that users will see when entering data that does not conform with the
defined rule. All form fields that require validation have a default error
message. The custom error message overwrites the default one.
The three buttons in the top right corner of the
interface offer you the next functionalities:
· Click OK when you are done configuring the server behavior.
· Click Cancel to exit without the new settings to be
applied.
· The Help button takes you to this help page.
These buttons appear on both interfaces of the Validate
Form trigger.
Click on the Advanced
tab to continue with configuring the trigger.
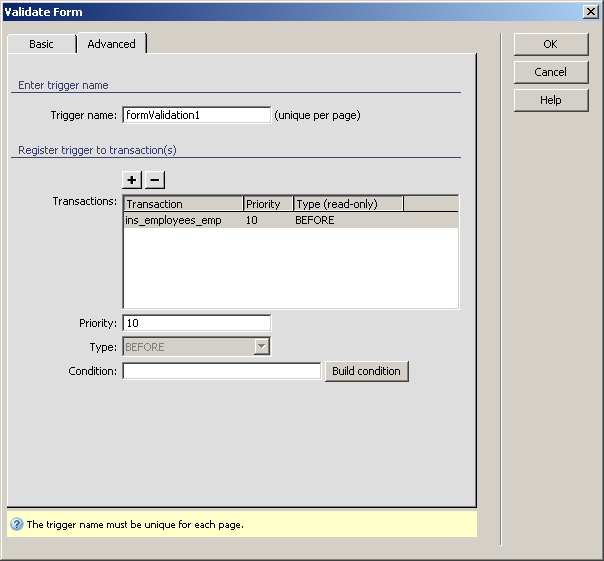
The Advanced tab
The purpose of this user interface tab is to allow the developer to
change the default trigger properties, to suit the particular situation.
All trigger properties (name, type, priority, transactions) can be set
from this dialog box:
For instructions on completing this step, see the
Advanced tab. For the Validate Form
trigger, by default the Priority is set to
10 and the Type is BEFORE,
as it should execute before the transaction takes place.
The server behavior added this way can be edited later by double-clicking
its name in the Server Behaviors tab of
the Application panel.