A server behavior is a reusable component for server-side development.
They add blocks of code to your pages for accomplishing specific tasks.
Dreamweaver comes with several default server behaviors and the InterAKT
extensions add many more to this list.
A transaction is a group of SQL statements whose effects are logically
connected. Anything from simple queries to inserting, and deleting operations
can be considered a transaction, as well as more complex groups of several
statements which accomplish a specific task.
Form Validation in wizards
If you have the whole MX Kollection 3
package installed, or even only MX Form Validation,
a new step in the Insert Record/Update Record/Custom
Form Wizard is available. The purpose of this step is to offer
you the possibility of defining a rule for each form element, so that
bad input will be avoided.
Due to this integration, it is not needed to add a separate validation
server behavior
when using one of the three wizards. The interfaces for these wizards
are almost identical, the only difference being the window's title:
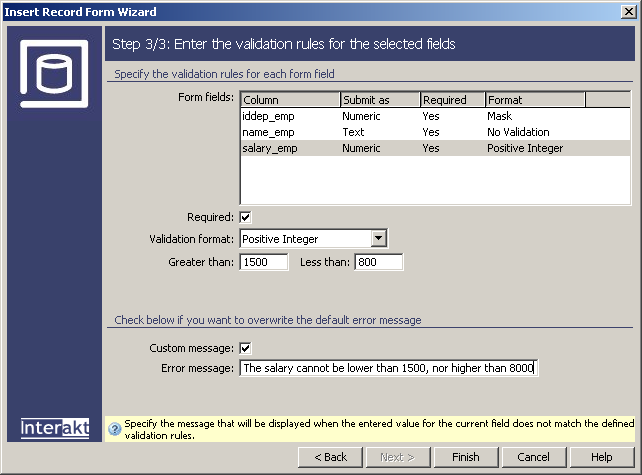
To set the dialog box options, follow the next steps:
The Form fields area
contains all the form fields in the current transaction.
Specify the validation rules for each
data-entry in the HTML form by selecting
a row (single click) in the Form fields grid
and entering the required information in the interface controls below
the grid. Read along for instructions.
The Required checkbox
defines whether or not the current field is mandatory when entering input
in the form.
In the Validation format
drop-down menu select the validation rule that will apply to the current
form field. Depending on the selected format, different controls will
appear on the interface. Read about all the possible options here.
If the Custom message
option is checked, you can define your own error message to be displayed
when the data does not match the validation format.
In the Error message
text box (enabled when the option above is checked) enter the custom message
that users will see when entering data that does not conform with the
defined rule. All form fields that require validation have a default error
message. The custom error message overwrites the default one.
After completing the user interface, click Finish to apply the wizard, Cancel
to dismiss it without making any changes, or Next
(if the case) to move on to the next step.