A database refers to data organized and stored on a computer that can
be searched and retrieved by a computer program. Most industrial-strength
and many smaller database applications can be addressed using SQL (Structured
Query
Language).
A query is a SQL command that will extract information from the tables
of a database. Essentially, a query is a request for information from
your database.
A server behavior is a reusable component for server-side development.
They add blocks of code to your pages for accomplishing specific tasks.
Dreamweaver comes with several default server behaviors and the InterAKT
extensions add many more to this list.
Insert Record Transaction
The basic building blocks of an insert page can be added separately
using the form tools and the Server Behaviors
panel. This procedure requires the adding of the following items:
an HTML
form that would allow users to enter data.
The form objects will be laid out in a basic table, which you can customize
by using the Dreamweaver page design tools
(make sure all the form objects remain within the form’s boundaries).
To edit the server behavior,
open the Server Behaviors tab of the Application panel (Window
-> Server Behaviors) and double-click
the Insert Transaction server behavior.
You can also add the building blocks all at once by using the Insert Record Form Wizard. For more information
on building an insert page in a single operation, see Insert
Record Form Wizard.
To add an HTML form
to an insert page, follow the next steps:
Create a new dynamic page (File
-> New) and lay out your page using the
Dreamweaver design tools.
Add an HTML form by
placing the insertion point where you want the form to appear and selecting
Insert -> Form
-> Form; an empty form is created on
the page. You may have to turn on Invisible Elements
(View -> Visual
Aids -> Invisible Elements) to
see the form’s boundaries, which are represented by thin red lines.
Name the HTML form
by selecting it first (single click on it in the Design
View of the involved file), then opening the Property
inspector (Window -> Properties), and entering a name in the
Form Name text box; you don’t
need to specify an action or method attribute for the form to tell it
where and how to send the record data when the user clicks the Submit
button. The Insert Record Transaction server
behavior sets these attributes for you.
Add a form object such as a text field (Insert
-> Form -> Text
Field) for each column of the database table into which you want
to insert records; the form objects are for the data entry. Text fields
are common for this purpose, but you can also use menus, check boxes,
and radio buttons.
For more information on form objects, see the Macromedia
Help on form elements.
Add a Submit button
to the form (Insert -> Form
-> Button); you can change the label
of the Submit button by selecting the button,
opening the Property inspector (Window ->
Properties), and entering a new value in the Label
text box.
To add an Insert
Record Transaction server behavior to an insert page, follow the
next steps:
Access the server behavior from the Application
panel, Server Behaviors -> + -> MX Kollection
-> Forms -> Advanced -> Insert Record Transaction.
Dreamweaver adds a server behavior to
the page that allows users to insert records in a database table by clicking
the Submit button on the form.
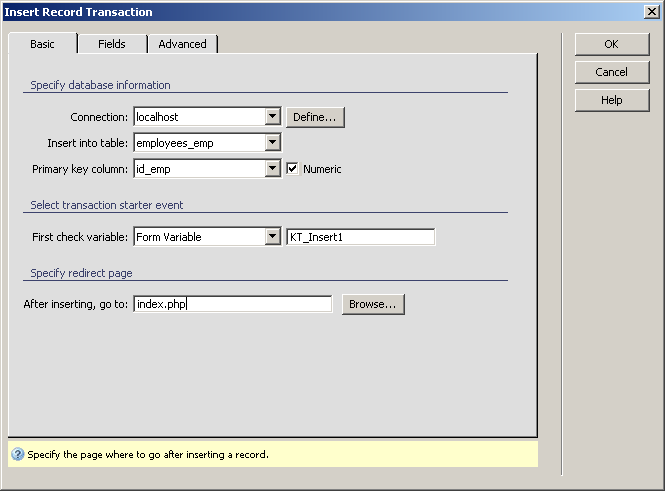
The Basic tab
The first step into completing the dialog box requires the user to input
basic information about the transaction, like the table in which new records
will be inserted and the page to which it will be redirected:
To set the dialog box options, follow the next steps:
In the Connection drop-down
menu select the database connection defined for your site; if you don't
have a connection yet, you can use the Define
button and create one now.
In the Insert into table
drop-down menu select the database table into which you want to insert
records.
In the Primary key column
drop-down menu specify the primary key column for the current table. The
content of this drop-down menu is refreshed each time the user changes
the table for the insert operation. By default, the first element is selected.
The Numeric checkbox
specifies whether the selected Primary key column
has a numeric type (integer, double, etc). The state for this checkbox
is altered each time the user changes the selected value of the Primary key column according to the meta-data retrieved
by Dreamweaver for the specified table column.
In the First check variable
drop-down menu select which element should act as a starter condition
for the insert operation (either URL Parameter, Form Variable, Cookie,
Session Variable, Server Variable, Entered Value), and type its name in
the associated text-box.
In the After inserting, go
to text box enter the page to be opened after the record is inserted
into the table, click the Browse button
to select the file page or use the InterAKT
Dynamic Data (the lighting bolt icon) to build the file name.
The three buttons in the top right corner of the
interface offer you the next functionalities:
· Click OK when you are done configuring the server behavior.
· Click Cancel to exit without the new settings to be
applied.
· The Help button takes you to this help page.
These buttons appear on all three interfaces of the Insert
Record Transaction server behavior.
Click on the Fields
tab to continue with configuring the server behavior.
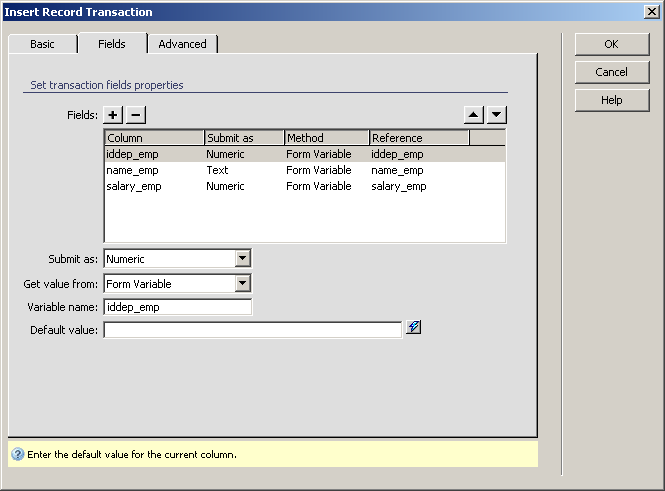
The Fields tab
This dialog box allows you to define exactly which fields get which
data and where they get it from, so you can associate database fields
with form controls:
To set the dialog box options, follow the next steps:
In the Fields area specify
the form objects you want to include on the HTML
form of the insert page, and which columns in your database table
each form object should update.
By default, ImpAKT creates a form object
for each column in the database table. If your database automatically
generates primary key ID's for each new record created, remove the form
object corresponding to the primary key column by selecting it in the
list and clicking the Minus (-)
button. This eliminates the risk of the user entering an ID value that
already exists.
The Plus (+)
button offers you the opportunity of reintroducing form objects that you
had previously removed, but decided that you want them back in the form.
You can also change the order of the form objects on the HTML
form by selecting a form object in the list and clicking the up
and down arrows on the right top side of the dialog box.
Specify the required settings for each
data-entry in the HTML form by selecting
a row (single click) in the Fields grid and
entering the required information in the interface controls below the
grid. Read along for instructions.
In the Submit as drop-down
menu select the data format accepted by your database table. For example,
if the table column only accepts numeric data, select Numeric. All the
options that you have are listed here: Text, Numeric, Double, Date, Check
box: Y,N, Check box: 1,0, Check box:-1,0, File.
In the Get value
from drop-down menu select the way the parameter is passed: URL
Parameter, Form Variable, Cookie, Session Variable, Server Variable, Entered
Value, Form in page, File field.
The next interface field depends on the selection
you made in the Get value from drop-down
menu. You might have to enter the Variable
name, to enter a static value, or to select a form field in the
page.
In the Default value
text box specify the default value for the selected field in the grid.
Notice the lightning
bolt icon that is displayed to the right of this field. It gives you the
possibility of selecting dynamic data into the field.
Click on the Advanced
tab to continue with configuring the server behavior.
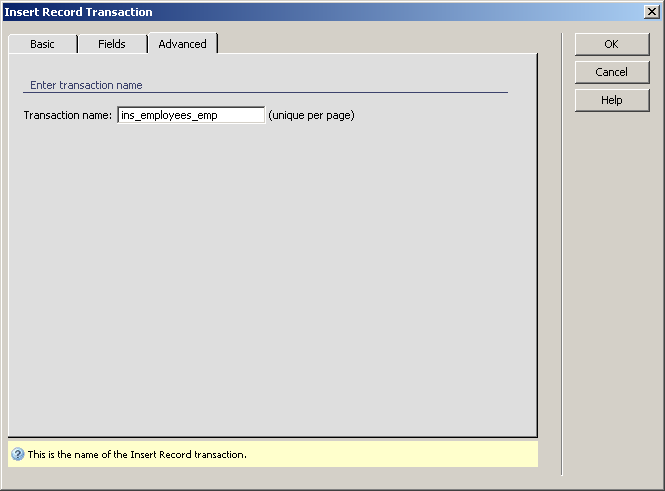
The Advanced tab
This last step in configuring the server behavior requires the user
to set some transaction options:
To set the dialog box options, follow the next steps:
In the Transaction name
text box enter the desired name for the insert transaction. Be careful
when choosing it, because it has to be unique on each page. By default,
MX Kollection 3 assigns unique names to
each transaction, and this setting should not be changed, unless you really
know what you are doing.
After completing the user interface, click on the
OK button to apply the server behavior,
or Cancel to dismiss it without making any
changes to your page.