![]()
|
|
![]()
|
|
In the first part of the tutorial you will create the basic pages using only Dreamweaver standard commands and server behaviors. You will create:
A page to display all contacts you have added to you list.
A page to add a new contact.
To store the contacts you will use the database created for the Contact Management Application tutorial, as shown here. Also define a new Dreamweaver database connection pointing to this database. Name it connMail.
First off you will fill in the index page with a list of contacts already in the database and a link to add new ones. Follow these steps to build the list:
Open the index page in Dreamweaver.
From the Application panel > Bindings tab > Plus (+) select the Recordset (Query) option. Fill in the user interface options as explained below:
In the Name text field enter rsContacts.
In the Connection drop-down menu select the connMails entry.
In the Table
drop-down menu select the contact_con table.
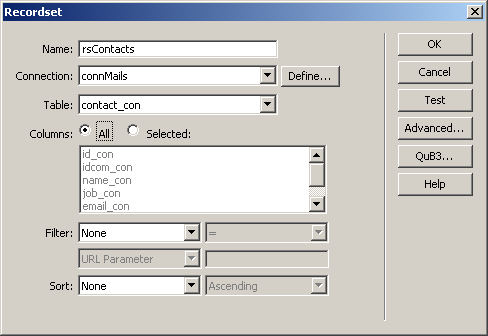
Click OK to create the recordset.
Now go to the Insert bar > Application tab (or menu) and apply the Dynamic Table command. Configure it as such:
In the Recordset drop-down menu select the rsContacts recordset created at step 2.
In the Show radio button group select the All records option.
In the Border text box enter 0.
For the Cell padding
and Cell spacing enter 4.
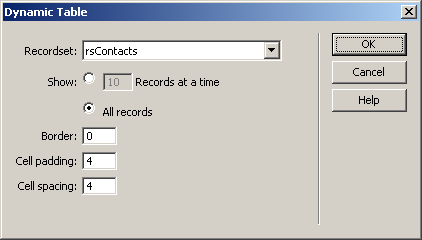
Click OK to create the dynamic table.
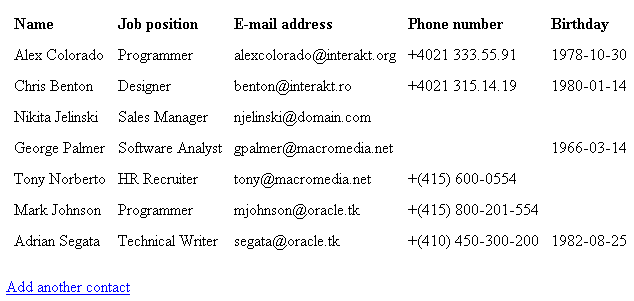
Now style the table that has been added. Remove
the id_con and idcom_con columns from the page and enter nicer texts for
the others - e.g. replace name_con with Name, email_con with E-mail address
and so forth. The end result should look like this:

Place the cursor after the dynamic table and press the Enter/Return key to create a new paragraph. There type: Add another contact. Select the text and turn it into a link pointing to the add_contact page.
This takes care of the contact listing page. If you want to preview it in a browser, make sure you save it first, then press F12 (or Apple - F12) in Dreamweaver:
In the second part of this section you will learn to create the standard Dreamweaver Insert form.
In this part you will create the form that allows adding contacts to the database.
On top of the page enter: Home > Add contact. Then select the Home word and turn it into a link pointing to the site index page. This helps if you decide to go back to the home page quickly.
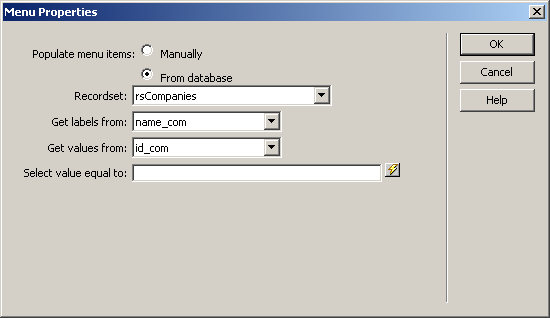
Next let's add a recordset with the companies. We will use it later on to supply default options for a contact. From the Application panel > Bindings tab > Plus (+) select the Recordset (Query) option. Configure the interface as follows:
In the Name text box enter rsCompanies.
In the Connection drop-down menu select rsMails.
In the Table
drop-down menu select company_com.
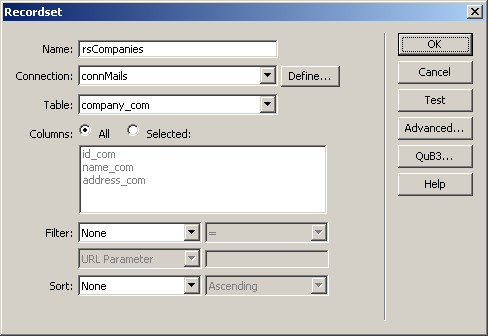
Click OK to create the recordset.
Now place the cursor on a new paragraph on the page, below the navigation link. Then,. from the Insert bar > Application tab apply the Record Insertion Form Wizard. Configure its user interface as follows:
In the Connection drop-down menu select connMails.
In the Table drop-down menu select the contact_con table.
For the After inserting, go to text box click the Browse button and select the index page in the site root.
In the Form fields area click the id_con field to select it and the Minus (-) button to remove it from the grid.
Click the idcom_con
field to select it. In
the Label text field enter Company.
In the Display As drop-down menu select Menu, then click the Menu
Properties button. There set it to use the rsCompanies
recordset and the name_com, id_com
fields for the label and value:
Select each of the other fields and from the
Label text box remove the _con
suffix. When done, the user interface should look like this:

When done setting the fields up, click OK to apply the server behavior.
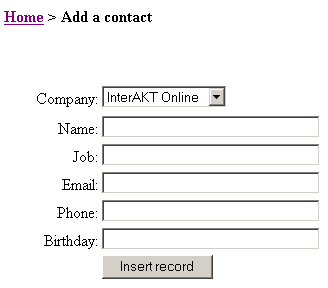
With this, the basic contact adding form has been completed. You can save the page and press F12 to preview it in a browser, and it should look like this:
In the following section you will enhance the form so that whenever you add a contact, an e-mail message will be dispatched, so that the other party can add you to his agenda as well.