![]()
|
|
![]()
|
|
Before you start building this application, make sure you have a correctly
configured Dreamweaver site, and a working database connection. For more
instructions regarding these actions, consult the Getting started book
help file, which can be found in Help -> InterAKT
-> Getting Started.
Through the tutorial, you will have to create several files and folders
in your site's root. You can create them at the very beginning, so that
you will not waste time with this operation again. To create files and
folders in the site's root, use the corresponding options in the File menu of the Files
tab.
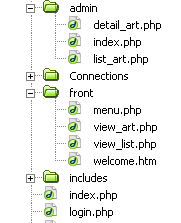
The file structure will look as in the example below, and you can create
it easily by unpacking the ZIP file corresponding to your server model
from \tutorials\Content Management System\ in
your site root:
After having created the files for your pages, it is time to set up the database that will hold the information to display. You can find the scripts needed to create an identical table structure inside the downloaded package, in the \tutorials\Content Management System\db\ folder, as an sql or mdb file, depending on the database server you intend to use.
For this tutorial, you will use two tables: one for the pages, and one
for the users. The fields' names are self-explanatory, as you can see
in the following image:
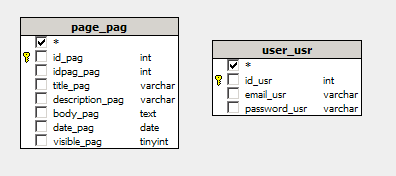
Note: The database diagram in the image above was built with MX Query Builder (also referred as QuB) to better illustrate the database structure. You do not need to build it in order to complete this tutorial.
Here's a listing of the tables and columns used in this database:
page_pag - the page
table stores all the site pages and their information
· id_pag
- the primary key
for the page table. No two pages will have the same id.
· idpag_pag
- this field serves as a self-foreign key. This is a reference to another
page within the page table. Here this field differentiates between article
lists, and the articles themselves. The idpag_pag field for a regular
article will contain the value of it's parent article. If any of this
is confusing just check out the Database concepts page for a little help.
· title_pag
- the title of the page.
· description_pag
- A brief text description of the page's contents.
· body_pag
- the actual
content of the page (HTML) is stored in this field.
· date_pag
- stores a date value to simplify updating.
· visible_pag
- stores the status for each page. If set to 0, the page is invisible.
user_usr - the user
table stores all users registered to the site, and some simple information
about them.
· id_usr
- the primary key for the user table. No two users can have the same id.
· email_usr
- the user's email address (rob_anderson@somedomain.org).
· password_usr
- the user's password for logging in.
You can find the scripts needed to create an identical table structure inside the downloaded package as a SQL or MDB file, depending on the database server you intend to use. Import them in your database server management software (e.g. PHPMyAdmin, Microsoft Access etc).
Sample data is already entered in the database. To login into the administrative section of the site, the default account is:
username: admin.
password: root.
Open the main index.php page and create a
new connection named connCMS and configure
it to connect to your newly created database:

Before moving on, remember to create the login page for your site. First configure your login settings, and then apply the Login Form Wizard on the login page in the site root.
In the next section you will begin creating the pages to manage articles and topics.