![]()
|
|
![]()
|
|
After creating a transaction for inserting or updating records in your tables, you can easily add upload capabilities to a form with MX Kollection 3.
The following prerequisites must be met before attempting to use the File Upload trigger:
Have a form element of the file field type, correctly bound to the table field.
Have a transaction on page, either Insert or Update.
Have proper access to the folder where you want to upload files (you must have user permissions on file and folders).
Access the trigger from the Application panel, Server Behaviors -> + -> MX Kollection -> File Upload -> Upload File. The user interface that opens is divided into three tabs. Configure them as shown below.
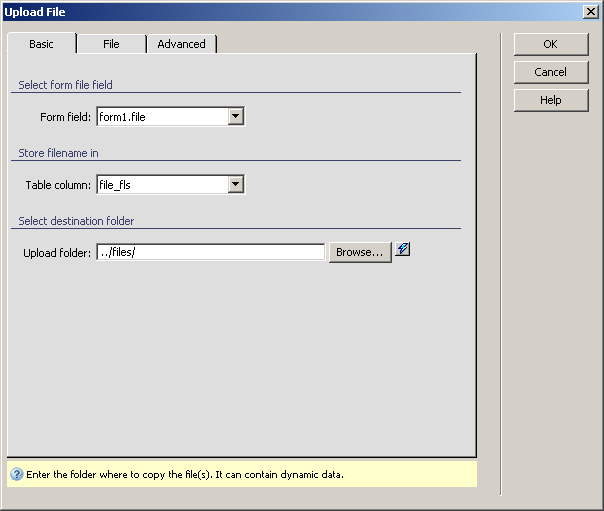
This tab contains options regarding the form binding and the file upload
folder:
To set the dialog box options, follow the next steps:
In the Form field drop-down menu select the form element to which the file upload trigger gets binded to. If you have multiple file field elements, select the right one in the list, or the files will not upload correctly.
In the Table column drop-down menu, select the column in the table which will store the filename.
In the Upload folder text box enter the folder on the server where you need to store your files or use the Browse button to select it from one of the site's folders. You can also use the InterAKT Dynamic Data lightning icon to insert dynamic placeholders into the text box. They will be replaced with their values at runtime. The mark-up is inserted into the text field relatively to the mouse cursor, or if the cursor is not in the text field, it will be inserted at the beginning.
Whenever in trouble, you can consult the Contextual help displayed on bottom of the user interface.
The three buttons in the top right corner of the
interface offer you the next functionalities:
· Click OK when you are done configuring the trigger.
· Click Cancel to exit without applying the new settings.
· The Help button opens this help page.
These buttons are common to all three tabs of the Upload
File
This tab contains options regarding file related settings:
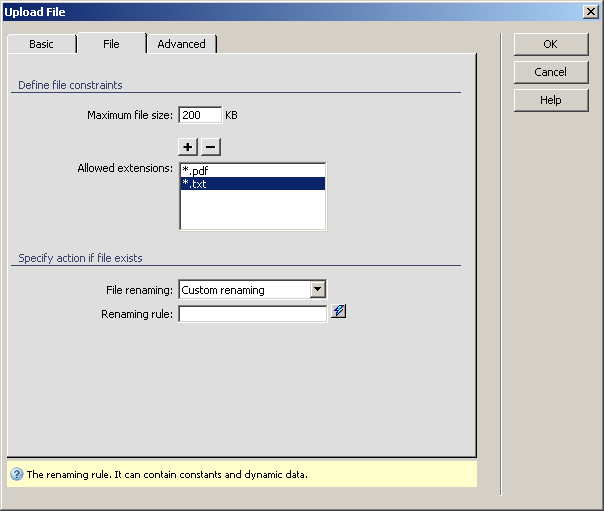
To set the dialog box options, follow the next steps:
In the Maximum file size text box define up to what size files will be allowed to upload on site in kB. Default value is 200 kB.
The Allowed extensions
list displays all extensions considered trusted, and therefore allowed
to be uploaded.
You can add a new extension by clicking
the Plus (+) button and entering the extension
format in the new dialog box. Similarly, you can remove an already entered
extension, by selecting it in the list and then pressing the Minus
(-) button.
In the File rename
drop-down menu select the action to take when a name conflict arises on
upload. Available options are:
· Automatic
renaming - this option allows preserving the new file by assigning
it a different name.
· Block
upload - choosing this option will block the upload attempt without
affecting in any way the existing file.
· Custom
renaming - choosing this option allows the user specify a format
to be used when doing renames. The format will be entered in the Renaming rule text-box, and can contain user-text
and dynamic data.
To select dynamic data to use, click the InterAKT
Dynamic Data lightning icon.
Click on the Advanced tab to continue with configuring the trigger or you can click OK to apply the trigger. The last tab is used only when the automatic assignment of the trigger to a transaction does not match your intentions or when you need more control over the trigger.
This tab allows advanced configuration of the trigger's behavior and
its association to one (or multiple) transaction(s):
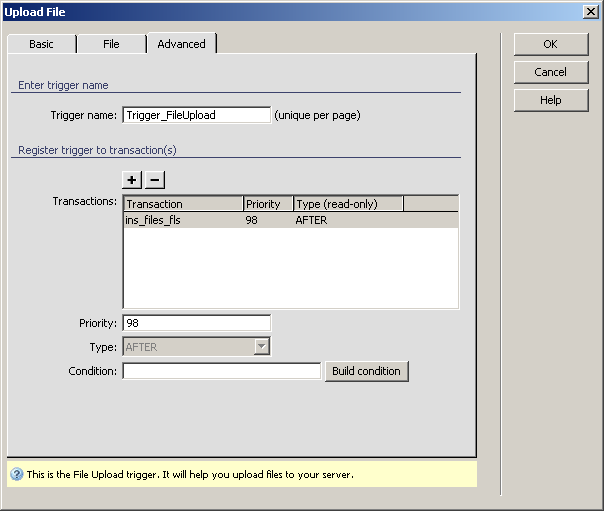
For instructions on completing this step, see the Advanced tab. For the Upload File trigger, by default the Priority is set to 98 (since the trigger works with files, it should be among the last ones on page, so a high priority number is recommended) and the Type is AFTER, as it should execute after the transaction was completed.
The server behavior added this way can be edited later by double-clicking
its name in the Server Behaviors tab of
the Application panel.