A server behavior is a reusable component for server-side development.
They add blocks of code to your pages for accomplishing specific tasks.
Dreamweaver comes with several default server behaviors and the InterAKT
extensions add many more to this list.
A recordset is the result of executing an SQL query.
It is composed of multiple rows, each row having multiple columns. The
columns presented in the query result depend on the column list declared
in the query (they can belong to different tables). The number of rows
and their order depend on the query conditions (WHERE, GROUP BY, HAVING,
ORDER). The recordset acts as a source of dynamic
data
in web applications.
A query is a SQL command that will extract information from the tables
of a database. Essentially, a query is a request for information from
your database.
The InterAKT Dynamic Data tool is a replacement for the standard dynamic
data dialog. It is used in the MX Kollection 3, to provide a unified way
of building mark-ups, or place holders. These are recordset fields, server
or session variables, and other types of dynamic data that are replaced
at runtime by their corresponding values
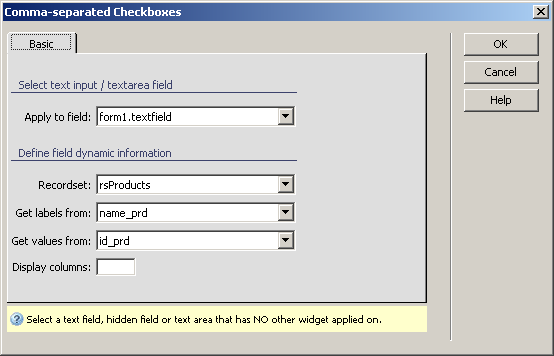
Configure Comma-separated Checkboxes
The Comma-separated Checkboxesserver behavior
allows the web developers to include comma-separated checkboxes in their
site pages. Before applying it, there must be a recordset
created in the Dreamweaver page, and also
an input item added.
This server behavior is accessible from the Application
panel, Server Behaviors -> + -> MX Kollection
-> Form Controls -> Comma-separated Checkboxes.
The user interface has only one tab. Directions about its correct configuration
are given below.
To set the dialog box options, follow the next steps:
In the Apply
to field drop-down menu select the text field on which to
apply the server behavior.
In the Recordset
drop-down menu select one of the recordsets defined in your page.
The selected recordset should contain the data that you want displayed
when using the comma-separated checkboxes.
In the Get
labels from drop-down menu select the table field that stores
the names you want to be shown besides the checkboxes.
In the Get
values from drop-down menu select the table field that stores
the value for the widget elements.
In the Display columns
text box insert the number of columns that will be displayed in browser
(to allow horizontal looping for the checkboxes).
The three buttons on the right of the interface offer
you the next functionalities:
· Click OK when you are done configuring the server behavior.
· Click Cancel to exit without applying the new settings.
· The Help button opens this help page.