In a database, tables are usually linked together in a logical way.
A link between two tables is called a "relation". A relation
always involves two tables ad two columns from them (one can create a
relation between a table and itself for representing a tree like structure)
A database refers to data organized and stored on a computer that can
be searched and retrieved by a computer program. Most industrial-strength
and many smaller database applications can be addressed using SQL (Structured
Query
Language).
A query is a SQL command that will extract information from the tables
of a database. Essentially, a query is a request for information from
your database.
A foreign key is a field from a database table that refers to (or targets)
a specific key, usually the primary key, in another table. This is a convenient
way of logically linking information from related tables in the same database.
For instance, a table that stores information about products can contain
a foreign key that references the primary key field in a table that stores
manufacturers. This way, each product has an associated manufacturer –
its associated foreign key points to the unique identifier of the manufacturer.
Please note that the foreign key is not unique, but the referenced field
(the primary key in the referenced table) usually is.
The InterAKT Dynamic Data tool is a replacement for the standard dynamic
data dialog. It is used in the MX Kollection 3, to provide a unified way
of building mark-ups, or place holders. These are recordset fields, server
or session variables, and other types of dynamic data that are replaced
at runtime by their corresponding values
Dependent Drop-down Wizard
The Dependent Drop-down Wizard automatically
creates two select form elements that are linked together. This is an
easier way to implement a dependent drop-down when compared to manually
adding the dependent drop-down widget, because it generates all necessary
elements. Plus, you can select the desired tables both for the master,
and dependent menu in a single interface. This gives you a better view
on the tables involved in the relation.
The Dependent Drop-down Wizard is accessible
from two locations:
The MX Kollection tab
of the Insert bar.
The Application panel,
Server Behaviors -> + -> MX Kollection ->
Form Controls -> Dependent Drop-down Wizard.
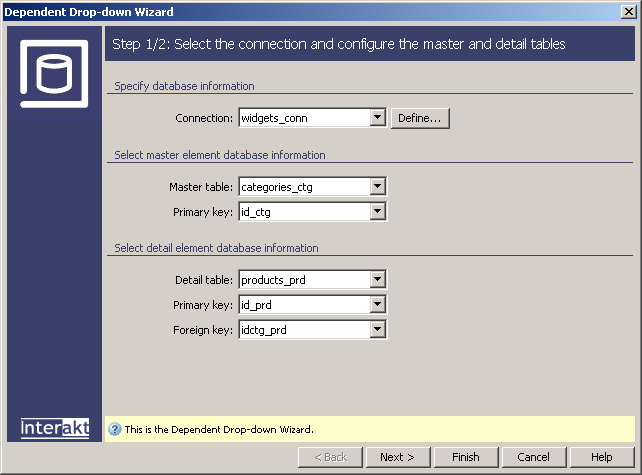
The user interface for the first step of the wizard looks like in the
following image:
To set the dialog box options, follow the next steps:
In the Connection drop-down
menu, select the database
connection used for your site, and through which to retrieve the menus
data.
In the Master table
drop-down menu, select the data source for the main menu - the master
one.
In the Primary key drop-down
menu, select the master table's field that contains the unique identifier.
In the Detail table
drop-down menu select the second menu's data source. This will be displayed
in the dependent drop-down menu, and it must contain a link to the master
table (as a foreign key).
In the Primary key drop-down
menu, select the detail table's field that contains the unique identifier.
In the Foreign key drop-down
menu select the detail table's field containing the link to the master
table.
The five buttons in the lower part of the interface
offer the following functionalities:
· With the
< Back / Next
> buttons you can navigate through the wizard's steps.
· Click Finish when you are done configuring the wizard.
· Click Cancel to exit without the new settings to be
applied.
· The Help button brings you to this help page.
These buttons appear on all three interfaces of the Insert
Record Form Wizard, so their role will not be explained again in
the next two steps.
Click Next to continue
with configuring the wizard.
The user interface for the second step of the wizard looks like in the
following image:
To set the dialog box options, follow the next steps:
In the Get labels from
drop-down menu of the master section,
select the master table's field containing the names to be displayed in
the menu for each element. A field for the value doesn't need to be selected,
as the primary key will be used (it was defined in the first step).
In the Get labels from
drop-down menu of the detail section,
select the detail table's field containing the names to be displayed in
the dependent menu, for each element.
In the Default value
text-box you can enter a value that will be initially displayed/selected
in the detail menu. You can use an entered, static value, as well as dynamic data,
by pressing the lightning icon next to the field.
When you are done configuring the wizard, click the
Finish button to apply it to the page.
It will insert two drop-down HTML form elements configured as dynamic
fields, the master and detail table's recordsets. Also, the second drop-down
menu (the dependent one), will have its type changed to the corresponding
widget.
The contextual help provides insight on each of the dialog box's elements.
To see help for a particular item, select the item, and some hints on
what it should be set to will be shown.