A server behavior is a reusable component for server-side development.
They add blocks of code to your pages for accomplishing specific tasks.
Dreamweaver comes with several default server behaviors and the InterAKT
extensions add many more to this list.
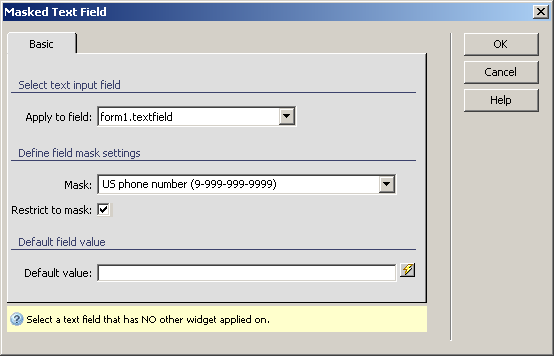
Configure Masked Text Field
The Masked Text Fieldserver
behavior
allows the web developers to include a masked text field in their site
pages. Before applying it, there must be a text field added in your Dreamweaver page.
This server behavior is accessible from the Application
panel, Server Behaviors -> + -> MX Kollection
-> Form Controls -> Masked Text Field.
The user interface has only one tab. Directions about its correct configuration
are given below.
To set the dialog box options, follow the next steps:
In the Apply
to field drop-down menu select the text field on which to
apply the server behavior.
In the Mask drop-down
menu select one of the predefined masks or create your own custom mask.
To learn more about this, read the note below.
The Restrict to mask
checkbox enables the option of limiting the text field input to the mask
type. If you do not check it, you can enter at
most as many characters as the mask has (so less, but not more).
In the Default
value text box enter a starting value for the masked text
field. You can also select it from one of the available recordsets in
your page by using the lightning icon on the right.
The three buttons on the right of the interface offer
you the next functionalities:
· Click OK when you are done configuring the server behavior.
· Click Cancel to exit without applying the new settings.
· The Help button opens this help page.
Note: A mask
is a validation format that provides an easy way to define your own rule
for acceptable field input. The rule you write determines what type of
input is allowed in each character position and the length of the entry.
For the Masked Text Field widget, the following
characters have special meanings:
A - Allows only the
UNICODE alphabetic characters (upper or lower-case) inside the following
ranges:
These are UTF8 character codes from the following UNICODE blocks:
· Basic Latin
· Latin Extended-A
· Latin Extended-B
· Greek
· Cyrillic
· Hebrew
· Arabic
X - Allows all the characters
that A replaces, plus all the digits (0-9).
9 - Allows a number:
0-9.
? - Allows any character.
If you enter any other character (other than the
above) it will be inserted into the field data.
Let's
consider the following example for a Mask
format: AAA?AAAA?AAAAA. The "Try this today" input is allowed,
while the "Try this tomorrow" or "Try it 5 times"
inputs are not allowed (the first one is too long, the second one contains
characters not accepted by the mask).