![]()
![]()
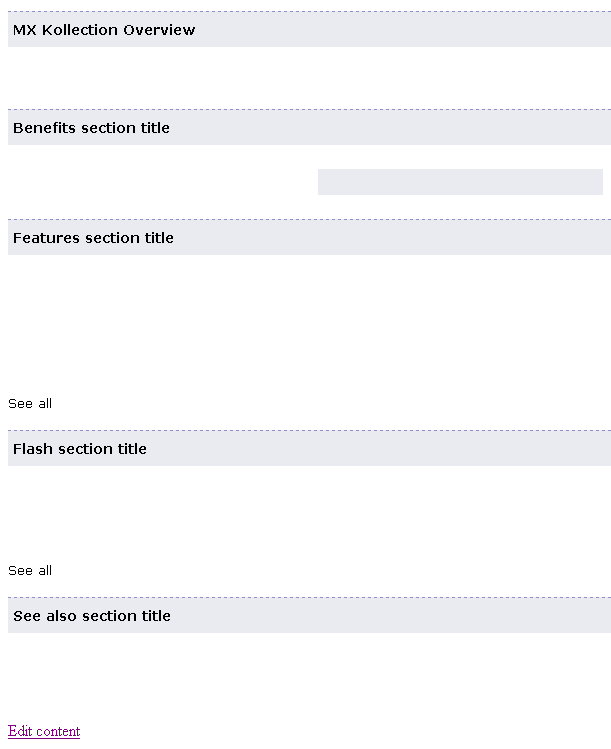
Remember that the goal of this tutorial is to create a presentation page for MX Kollection very similar to the 'official' webpage (ignoring the nuggets on the right, and the header and menu on top). Notice that there are five sections that you have to build:
The first step to take is to create the layout. Before starting to work
on that, open the display page in Dreamweaver
and preview it in browser. It should look similar to this:
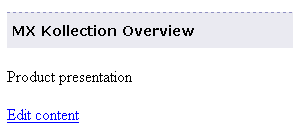
Click the Edit content link
to update the current content ("Product
presentation"). The edit page
will be displayed in browser:
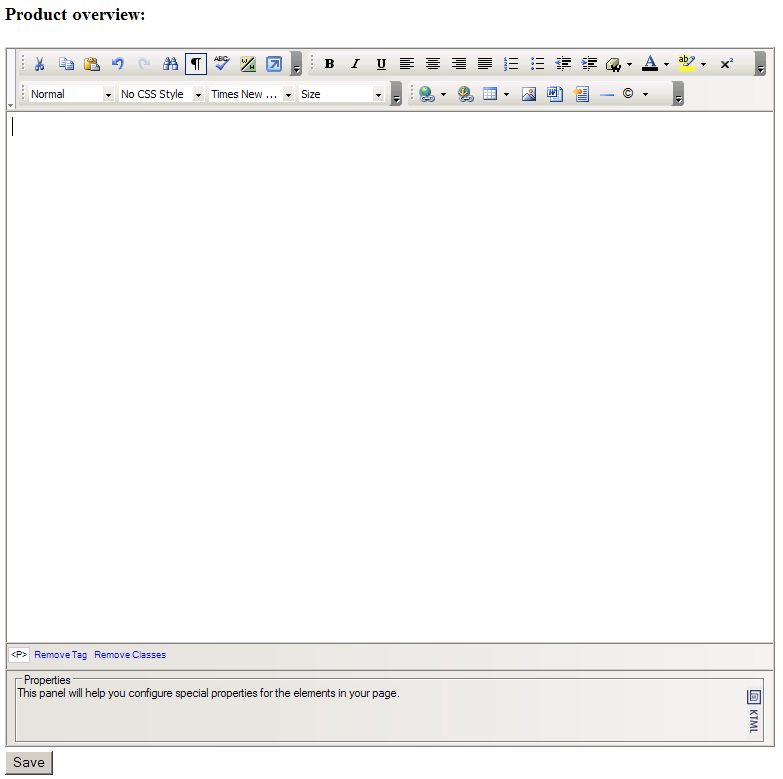
The steps for creating the page layout are grouped below by the five sections. First of all though, press Ctrl+A to select the current text ("Product presentation") and then press the Delete key to remove it.
To build the layout for the Introduction section, follow the next instructions:
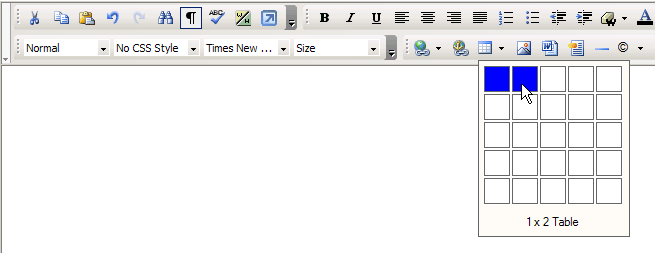
Insert a table with 1 row and 2 columns
at the very beginning of the page. Click the right part of the Insert
Table button (the down arrow) and visually set the specified dimensions:
Click inside the table and then select the <TABLE> tag in the Tag Selector.
Configure the Table Inspector as shown below:

Enter 600 in the Width text box.
Enter 0 in the Border text box as the table will have no border.
Leave the other controls at their default values.
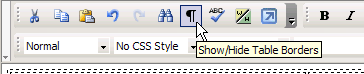
In order to see the table although
it has invisible borders, click the Show/Hide Table
Borders button:
Click inside the first column/cell (the <TD> tag is selected in the Tag Selector). In the Cell Inspector, set the width to 390 pixels (enter 390 in the Width text box).
Click inside the second column/cell (the <TD> tag is selected in the Tag Selector). In the Cell Inspector perform the following actions:
Select the Center option in the H Align drop-down menu to center the content horizontally.
Select the Top option in the V Align drop-down menu, to place the content on top of the cell (vertical alignment).
To build the layout for the Benefits section, follow the next instructions:
In the empty paragraph below the table inserted above enter "Benefits section title". It is a temporary text that you will replace and format later on. You're now just saving space for it.
Press Enter to create a new paragraph.
Insert a table with 1 row and 2 columns, just like shown above.
Click inside the table and then select the <TABLE> tag in the Tag Selector. In the Table Inspector configure the following settings (leave the others at their default):
Enter 600 in the Width text box.
Set the cell padding to 5 pixels.
Set the cell spacing to 5 pixels.
Enter 0 in the Border text box as the table will have no border.
Click inside the first column/cell (the <TD> tag is selected in the Tag Selector). In the Cell Inspector, set the width to 290 pixels (enter 290 in the Width text box).
Click inside the second column/cell (the <TD> tag is selected in the Tag Selector). In the Cell Inspector perform the following actions:
Select the Center option in the H Align drop-down menu to center the content horizontally.
Select the Top option in the V Align drop-down menu, to place the content on top of the cell (vertical alignment).
In the Bg Color text box enter #EAEAF1 to set the cell background color.
To build the layout for the Notable features section, follow the next instructions:
In the empty paragraph below the table inserted above enter "Features section title" (temporary text). Select this text, and from the Format drop-down menu choose the Heading 2 option.
Press Enter to create a new paragraph.
Insert a table with 3 rows and 2 columns, just like shown above.
Click inside the table and then select the <TABLE> tag in the Tag Selector. In the Table Inspector configure the following settings (leave the others at their default):
Enter 600 in the Width text box.
Set the cell padding to 9 pixels.
Set the cell spacing to 0 pixels.
Enter 0 in the Border text box as the table will have no border.
Click inside each of the six table cells, and in the Cell Inspector select the Top option in the V Align drop-down menu. This will ensure that the entered text is placed at the top of the cell.
In the empty paragraph below the inserted table enter "See all" (temporary text - it will become a link).
To build the layout for the Flash movies section, follow the next instructions:
Create a new paragraph after the "See all" text and enter "Flash section title" (temporary text). Select this text, and from the Format drop-down menu choose the Heading 2 option.
Press Enter to create a new paragraph.
Insert a table with 2 rows and 3 columns, just like shown above.
Click inside the table and then select the <TABLE> tag in the Tag Selector. In the Table Inspector configure the following settings (leave the others at their default):
Enter 600 in the Width text box.
Set the cell padding to 5 pixels.
Enter 0 in the Border text box as the table will have no border.
Click inside each of the six table cells. Configure the Cell Inspector as follows:
Enter 200 in the Width text box (it is enough to only set this option for the cells on the first row).
Select the Center option in the H Align drop-down menu.
Select the Top option in the V Align drop-down menu.
In the empty paragraph below the inserted table enter "See all" (temporary text - it will become a link).
To build the layout for the See also section, follow the next instructions:
Create a new paragraph after the "See all" text and enter "See also section title" (temporary text). Select this text, and from the Format drop-down menu choose the Heading 2 option.
Press Enter to create a new paragraph.
Insert a table with 2 rows and 2 columns, just like shown above.
Click inside the table and then select the <TABLE> tag in the Tag Selector. In the Table Inspector configure the following settings (leave the others at their default):
Enter 600 in the Width text box.
Enter 0 in the Border text box as the table will have no border.
For the two cells in the first column set the H Align drop-down menu to Right and the V Align drop-down menu to Top (click inside each one of them and configure these settings in the corresponding Cell Inspectors).
In a similar way, set the V Align drop-down menu to Top for the two cells in the second table column.
You're not done with the layout quite yet. Before continuing, set the font face and the font size used in this page:
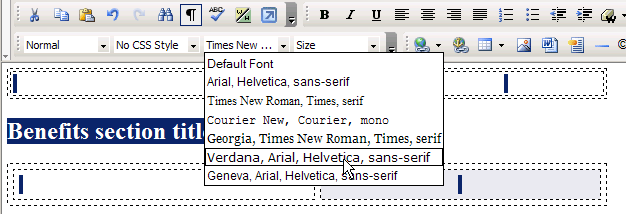
Press Ctrl+A
to select all the current content and from the Font
Face drop-down menu set the font to Verdana:
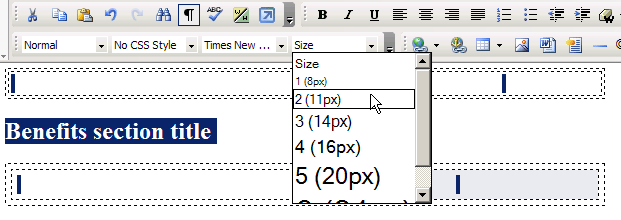
Still having all the content selected, use the
Font Size drop-down menu to set the font size
to 2 (11 px):
Select each of the section titles (Benefits section
title, Features section title, Flash section title, See also section title)
and from the Format drop-down menu choose the
Heading 2 option:

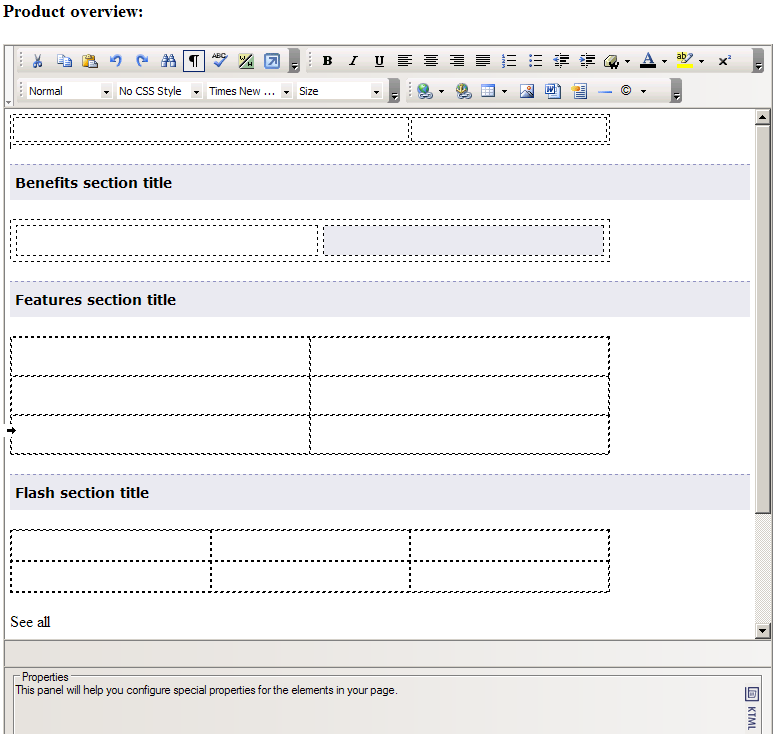
After following all the steps above, the KTML
area in the edit page should look like below
(when showing the invisible elements, namely the
table borders):
Click the Save
button to save the current content in the database and to be redirected
to the display page: