![]()
|
|
![]()
|
|
In this tutorial you will learn how to insert and display content from a database field which is stored as comma-separated values. You can add values to such a field easy using the Comma Separated Checkboxes or Comma Separated Menu widgets. To display the values, you need to add some code to the page. In this tutorial you will use such a field to store multiple foreign keys to a second table. To insert values you will use the Insert Record Form Wizard.
To complete this tutorial you will need the following Dreamweaver extensions:
The estimated time to complete this tutorial is of about 20-25 minutes, but it depends on your authoring experience with Dreamweaver and MX Kollection 3.
In this tutorial you will use a simple database structure, with two tables: one that stores student data, and one for the foreign language courses that can be attended. The database structure is as shown below:
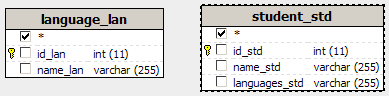
The database tables have the following structure:
language_lan - stores information about the foreign languages that can be learned.
id_lan - table primary key, stores the unique identifier for each entry in the table.
name_lan - the label to display for each entry. The language name.
student_std - stores information about the students .
id_std - the table primary key, stores a unique identifier for each entry in the table.
name_std - the student name.
languages_std - stores a list of foreign keys to the language_lan tables. The primary keys from the language_lan table for which the student is subscribed are stored as comma-separated values.
To create a similar database structure you can use the .sql and .mdb scripts that are included in the downloaded package, in the tutorials\HowTo\Display Comma-Separated Values folder.
For this tutorial you will only create two files in the site root:
index - displays a list of students, the courses for each one of them and a link to add new students.
insert - contains the form that allows adding a new student with the list of languages.
You can create these files up front, in order to use them later on when creating the actual content.
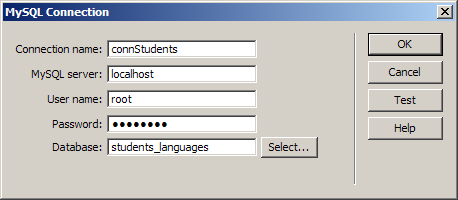
Before you start working on the site pages you must create a Dreamweaver database connection. Open one of the files you have created and, from the Database tab of the Application panel click on the Plus (+) button and select the option to create a new database connection - connStudents. Configure it according to your particular server model.
In the next topic you will create the page that allows adding new records to the database.