![]()
|
|
![]()
|
|
In this section of the tutorial you will actually create the new skin that uses your custom images for buttons, and some other changes.
To start creating the skin, follow the next steps:
Duplicate the aqua folder in the includes/skins folder in your site root. Rename the duplicate with the same name as the desired skin. Since the main color of this template is green, let's name the skin green.
Copy the button_big.gif and button_smallest.gif files from the zip package (or the folder where you created them) into the includes/skins/green/images folder. As mentioned in the previous page, the images folder stores all graphical elements used by the CSS files. When asked if you want to overwrite the existing files, click Yes. Also, copy the preview.gif file over the existing one in the includes/skins/green folder. This will allow you to identify the skin when selecting it in Dreamweaver.
Through this action, you have replaced the original buttons with the custom created ones. The buttons are already changed.
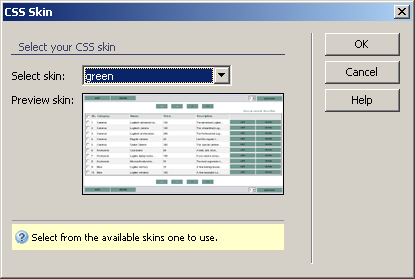
In order to see what changes are made, you must
apply the skin. To do so, open the InterAKT Control
Panel > CSS Skin and from the drop-down menu select the green entry.
Now upload the includes folder to your server.
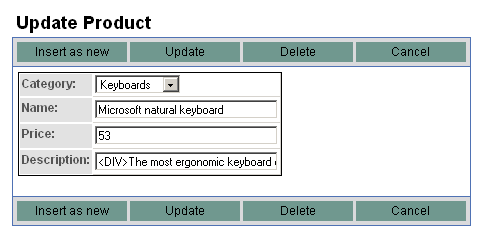
Notice how all buttons have already changed to the new images, without
writing or changing a line of CSS code -
for all pages: list, form and contact form:
If you want to use buttons of a different size however, you must edit the nxt.css and tng.css file, the section corresponding to each button type (big and smallest) and set the new width and height.
The next step into creating a new skin is to replace the color used when highlighting list rows. At this point, it still uses the dashes if gray from aqua.
For the highlight colors, there are two options
to set in the CSS file: the color to use
when moving the mouse over each row, and the one to use when the row is
checked (after being clicked once). To alter them, you must change the
following CSS sections:
/* selected row (checkbox is clicked) */
.KT_tnglist tr.KT_highlight {
background-color: #E2E2E2;
}
.KT_tnglist tbody tr.KT_over {
background-color: #E2E2E2 ! important;
}
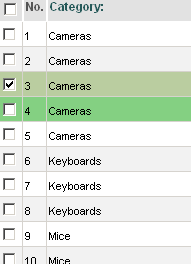
The first color to set is when the row is selected.
Let's change the shade of gray to a shade of green: #BACDA0.
When rows are selected, the list will look like the following image:

The second color to change is the color the row
takes when the mouse is over it. Change it to #84D082.
Save and upload the nxt.css file, and move the
mouse over rows to see the result:
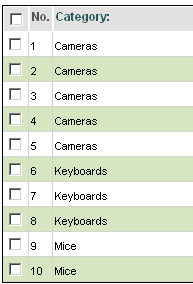
The last element to change regarding the NeXTensio list is the way even rows are colored.
The CSS code handling this is the following:
.KT_tnglist tr.KT_even {
background-color: #F2F2F2;
}
To display even rows in a different shade, replace
the existing color (#F2F2F2) to #D5E6C1.
Upload the nxt.css file and refresh the page.
Results are immediate.
When adding new links to a list or form, you might want to give them the same look as the rest. In order to benefit from the automatic conversion to a button, and the usage of skins for all manually added links, you need to set their style property to use the KT_link class.
These are the first steps in creating a skin to integrate MX Kollection elements into your site. Just a few image editing operations, some CSS knowledge and you're off.
If you need more information on CSS, read the W3C CSS primer
For more information on using Skins with MX Kollection, read the User manual section.