![]()
|
|
![]()
|
|
The last page in the company folder will allow you to delete companies from the database. To implement the actual delete operation, the Delete Record Transaction will be used. It is similar to the Insert/Update wizards and it also uses the user interface persistence to fill in its fields. At the same time, it is different from the Insert and Update wizards as it does not add any HTML elements into the page.
To create the company delete page, follow the next steps:
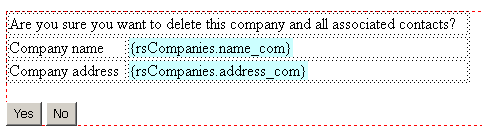
Unlike for the other pages, the delete page's design section will help you set up a safety net for the delete operation. More exactly, you will create a page section which will display details of the company to delete, and ask for confirmation. This way, you will not be able to delete a record accidentally, simply by clicking on the delete link in the main page.
To create the page design, follow the next steps:
Add another button at the right. Change its display value to No. Leave the button name to its default state, as you will apply a simple Dreamweaver behavior, which opens another URL on click. This change will be done later in the tutorial.
Now, the page design should display the company details and the Yes/No buttons:
Let's first make the No button redirect the page to the main index page. Select the No button.
For Dreamweaver MX 2004 users - open the
Tag Inspector Panel, the Behaviors
tab, and select Go To URL.

For Dreamweaver MX 6.1 users - open the
Design panel, the Behaviors
tab, and select Go To URL.

Select the index page.
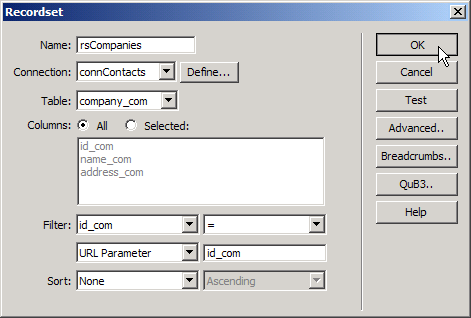
Next, you'll have to apply the Delete Record Wizard. You can find its button on the MX Kollection tab of the Insert panel (in the upper left side of the Dreamweaver window, below the menu). After the dialog box opens, you'll notice that most of the fields are already correctly completed: Connection, Delete from table, Primary key column and Primary key equals. If left like this, the delete operation would occur immediately when the page loads, making our safety net completely useless. There is however one dialog box option that lets you define a start condition: the First check variable field.
To start the delete action only after pressing the Yes
button, select in the First check variable drop-down
menu the Form Variable option. Type in the
corresponding text field the exact name of the Yes
button, as defined earlier (at step 8 of this section of the tutorial)
- KT_Submit.

Since all other fields are already set up, click the OK button to add the server behavior to the page. If you simply preview the page in the browser, you will only see the empty placeholders for the dynamic data. This happens because the page is expecting a value for the id_com URL parameter. Please click the Delete link from the index page.
This is the last page to be created in the company folder. Through the existing pages, all needed operations on companies are covered: adding, editing and deleting are all implemented. It is time to move on to the second section of the site: the contacts.